Introduction
This guide aims to discuss the functionality of the duty traffic mode in multiplayer mode, present the available devices in settings, discuss ways of setting routes and communication with other players who take on the roles of engineers and duty traffic officers of neighboring posts.
- 1. Introduction
- 2. Devices found in the dispatch station
- 2.1. Dispatch desktop
- 2.3. Electronic Train Journal screen
- 2.4. Train control computer system screen
- 2.5. Cube control desk
- 3. Controlling train traffic using computer devices
- 3.1. Tracks with automatic linear block
- 3.1.1. Arrivals
- 3.1.2. Departures
- 3.1.3. Passing
- 3.1.4. Releasing train routes
- 3.1.5. Releasing the interlock’s direction
- 3.1.6. Issuing the interlock setup command
- 3.1.7. Alternate traffic management
- 3.2. Lines with semi-automatic interlock
- 3.2.1. Arrivals
- 3.2.2. Departures
- 3.2.3. Running on substitute signal - entering the station
- 3.2.4. Running on substitute signal - exiting the track
- 4. Controlling train traffic using relay devices
- 4.1. Preparing train route and signaling on semaphore
- 4.2. Resolving train route
- 4.3. Controlling traffic with substitute signal
- 4.4. Dispatching trains on the opposite track
- 4.4.1. Releasing linear block direction
- 4.4.2. Ordering to change the interlock direction
- 4.4.3. Dispatching a train to the opposite track
- 4.4.4. Letting in a train going on the opposite track
- 4.5. Dispatching on the semi-automatic interlock
- 4.5.1. Arrivals
- 4.5.2. Departures
- 5. Communication with other players
- 5.1. Telephone conversations with neighboring dispatches
- 5.2. Radio telephone conversations
Devices in the dispatch station
In each dispatch station, there are interactive elements such as a clock displaying the current time, lights illuminating the interior of the room activated by a button on the wall, a desk light illuminating the dispatch station desk, as well as devices related to controlling train traffic.
These include:
Dispatcher desktop,
Electronic Train Journal screen,
Train control computer system screen,
Cube control desk.
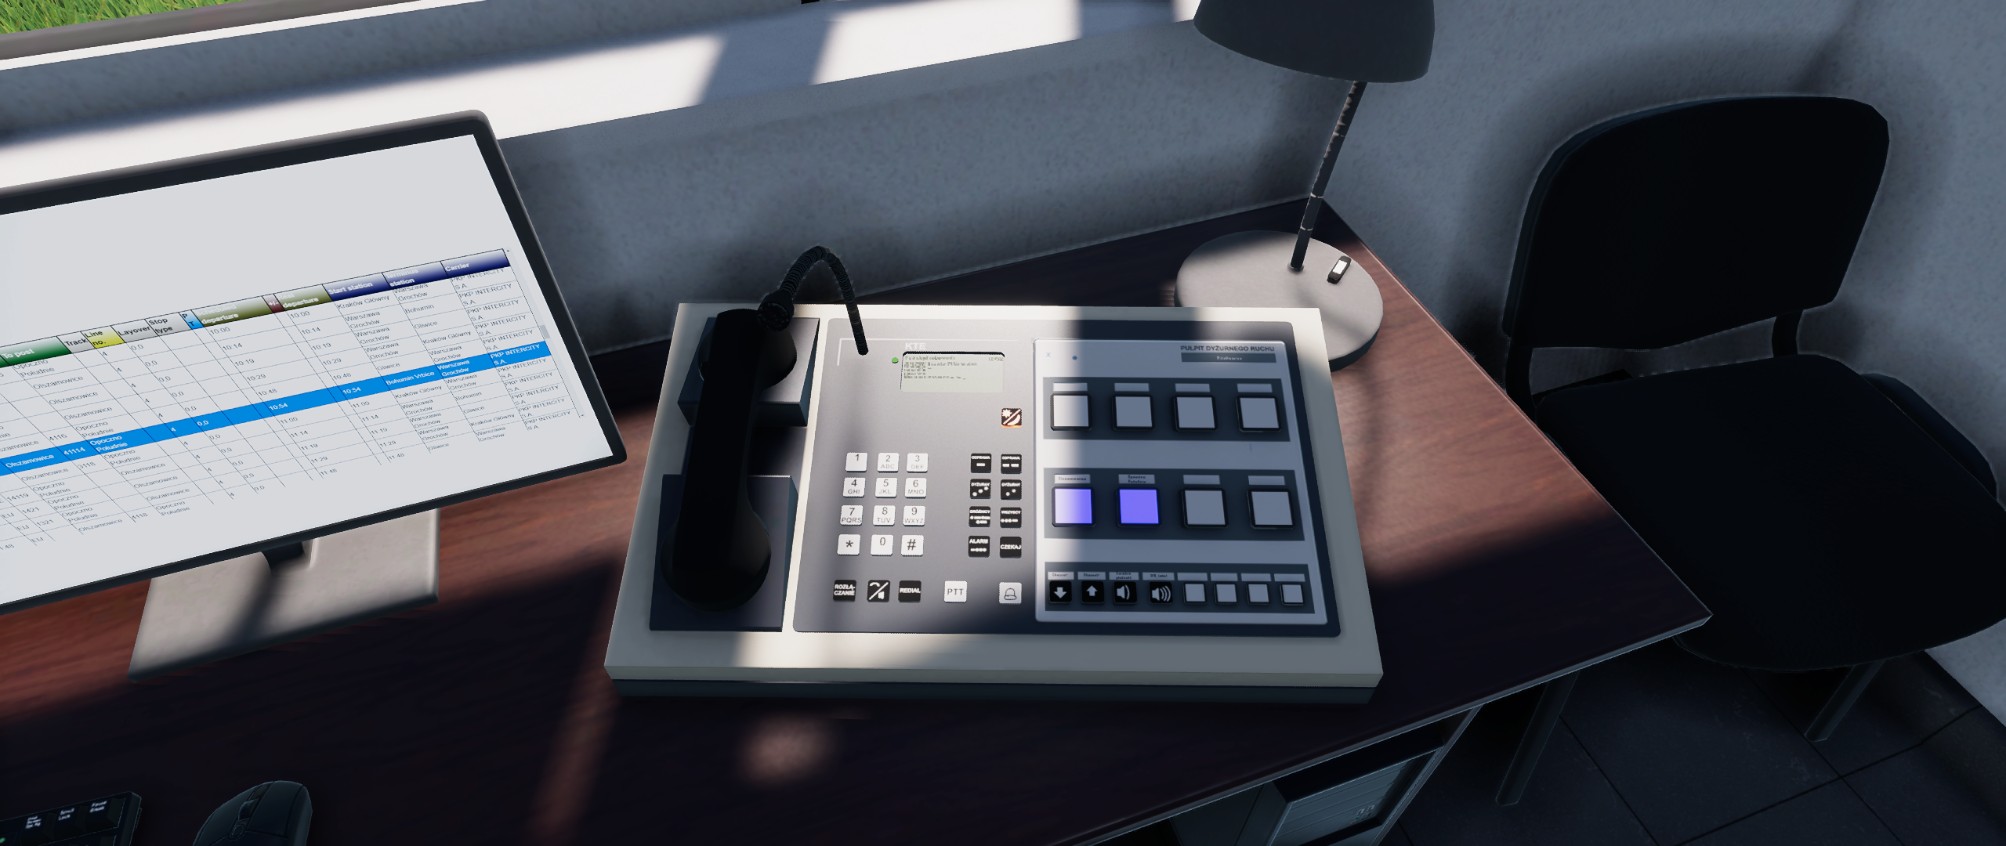
Dispatcher desktop

This telephone is used to call the neighboring station’s dispatchers. More information about this device is provided further down in this manual.
Electronic Train Journal screen
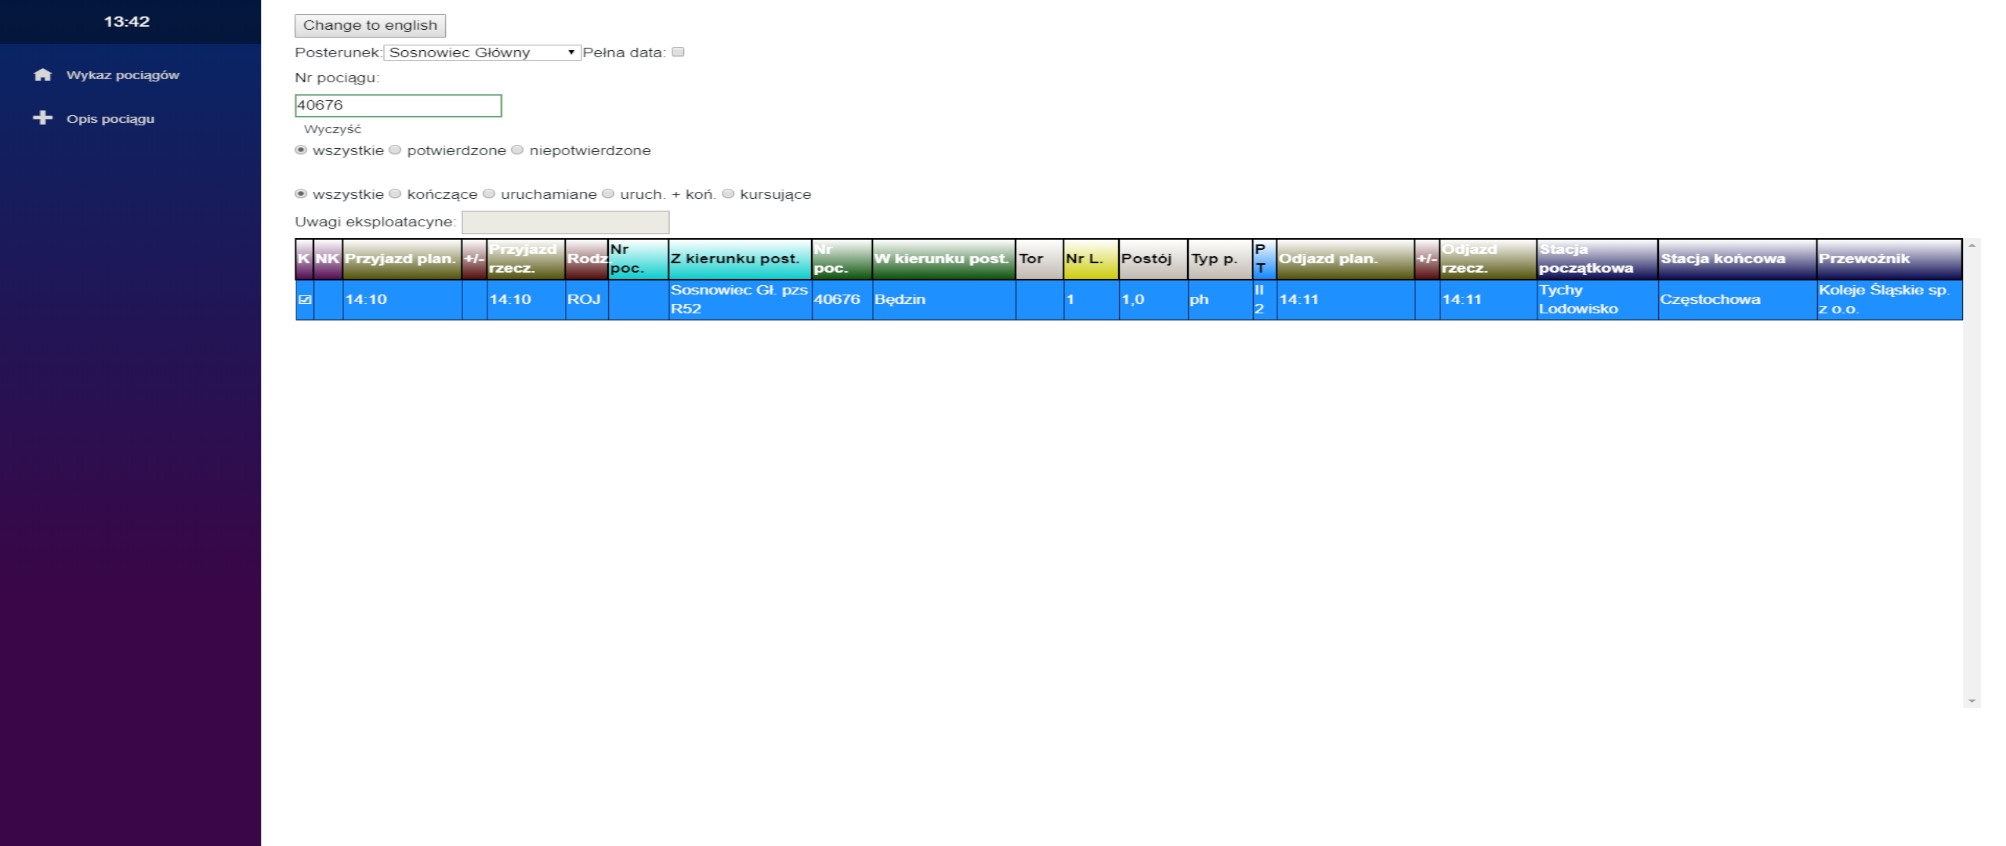
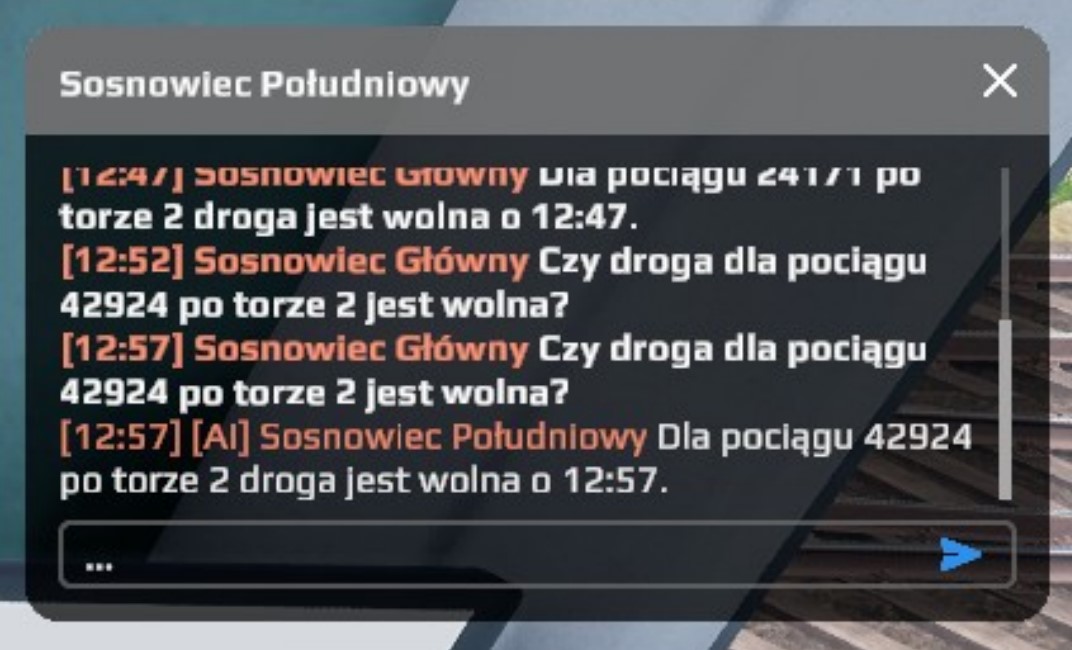
To open the journal in the full screen click on the monitor. Here you can see data about all trains coming to, from and through your stations. If your signal box has control over more than one post you can switch the data by using “Posterunek” list.
Accordingly. If you choose “Sosnowiec Główny” you’ll have information about the planned arrival and departure times, as well as platforms and tracks in use. Choosing the pzs R52 post will show the trains passing through the junction leading to Sosnowiec Południowy via line 660, with information about where to route the trains.
- Column description
- K/NK – information if the train is running or not
- Przyjazd plan. - scheduled arrival time
- +/- - time difference between schedule and actual time: (+) is for the delay, (-) for the expedition
- Przyjazd rzecz. - actual arrival time
- Rodz. - train type
- Nr poc. - train number on arrival
- Z kierunku post. -direction of arrival
- Nr poc. - train number on departure
- W kierunku post. - departure direction
- Tor – number of track the train is planned to go on
- Nr L. - n number of line the train departs to
- Postój – layover time at the station
- Typ p. - layover type (ie. for picking up passengers or for shunting)
- P/T – platform (Roman number) and track (Arabic number) the train should arrive at
- Odjazd plan. -scheduled departure time
- +/- - time difference between schedule and actual time: (+) is for the delay, (-) for the expedition
- Odjazd rzecz. - actual departure time
- Stacja początkowa – station of origin
- Stacja końcowa – final station
- Przewoźnik – carrier’s name
Train control computer system screen
Clicking on the monitor opens the control computer’s screen in full screen.
Cube control desk
The cube control desk is used directly from the 3D view.
Information about dispatching using both these control systems are provided in the further part of this manual.
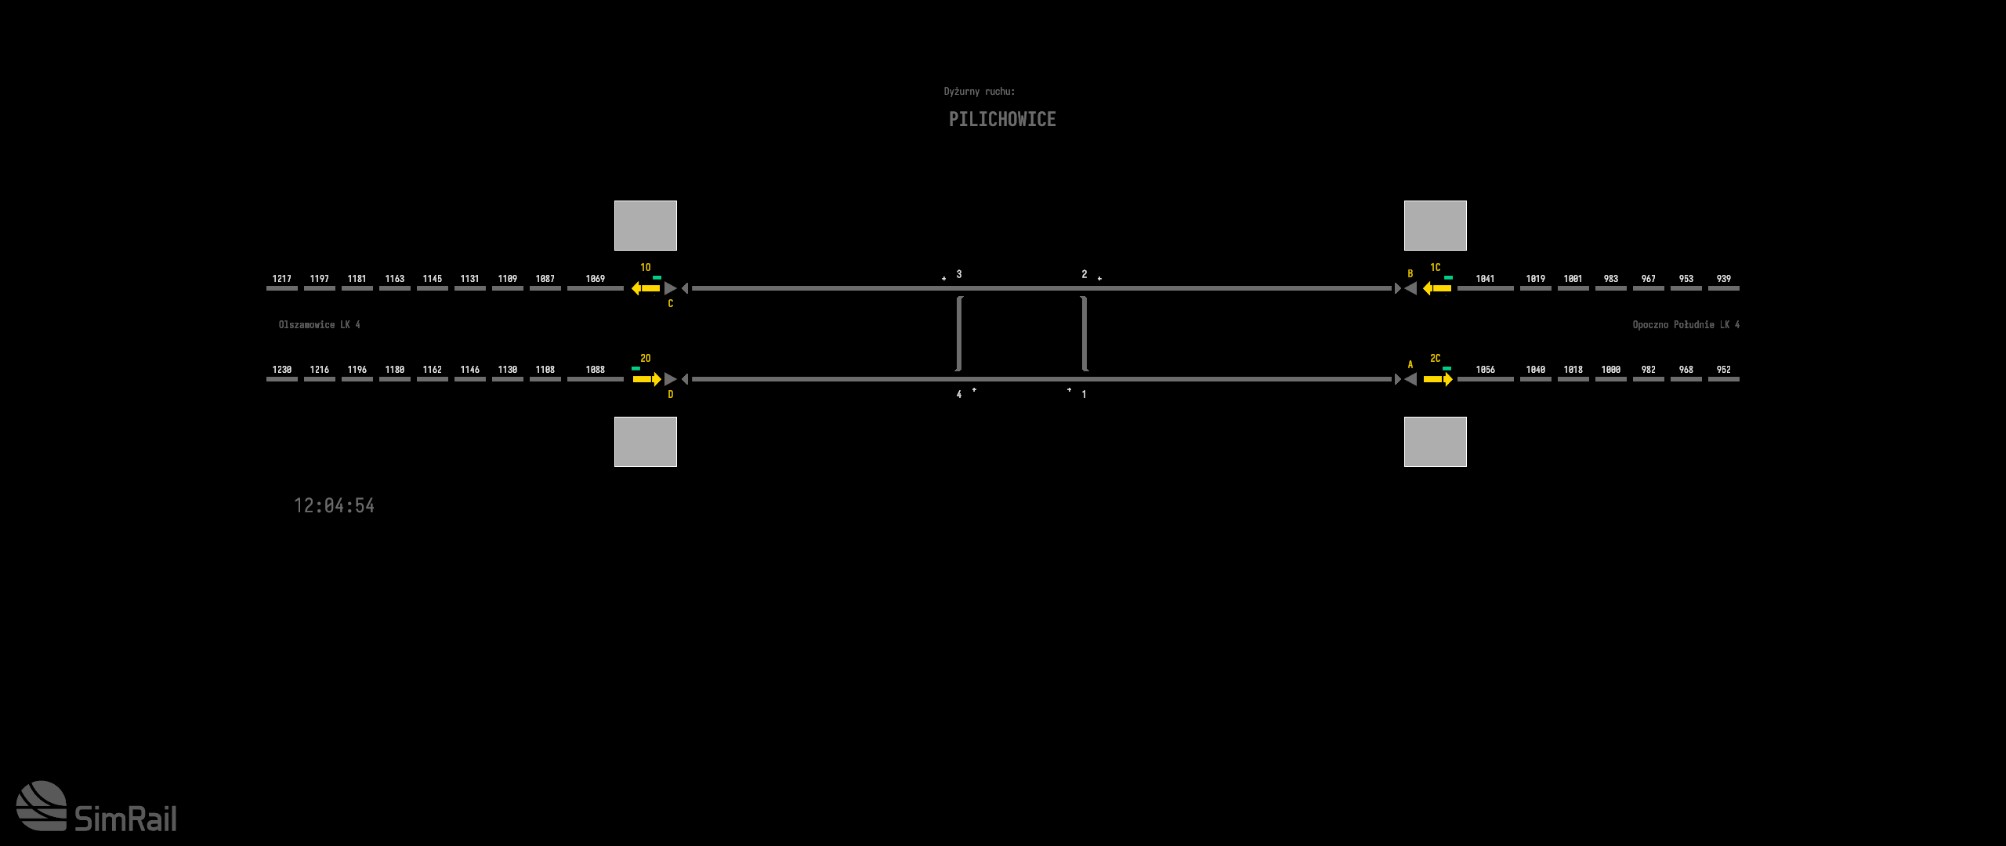
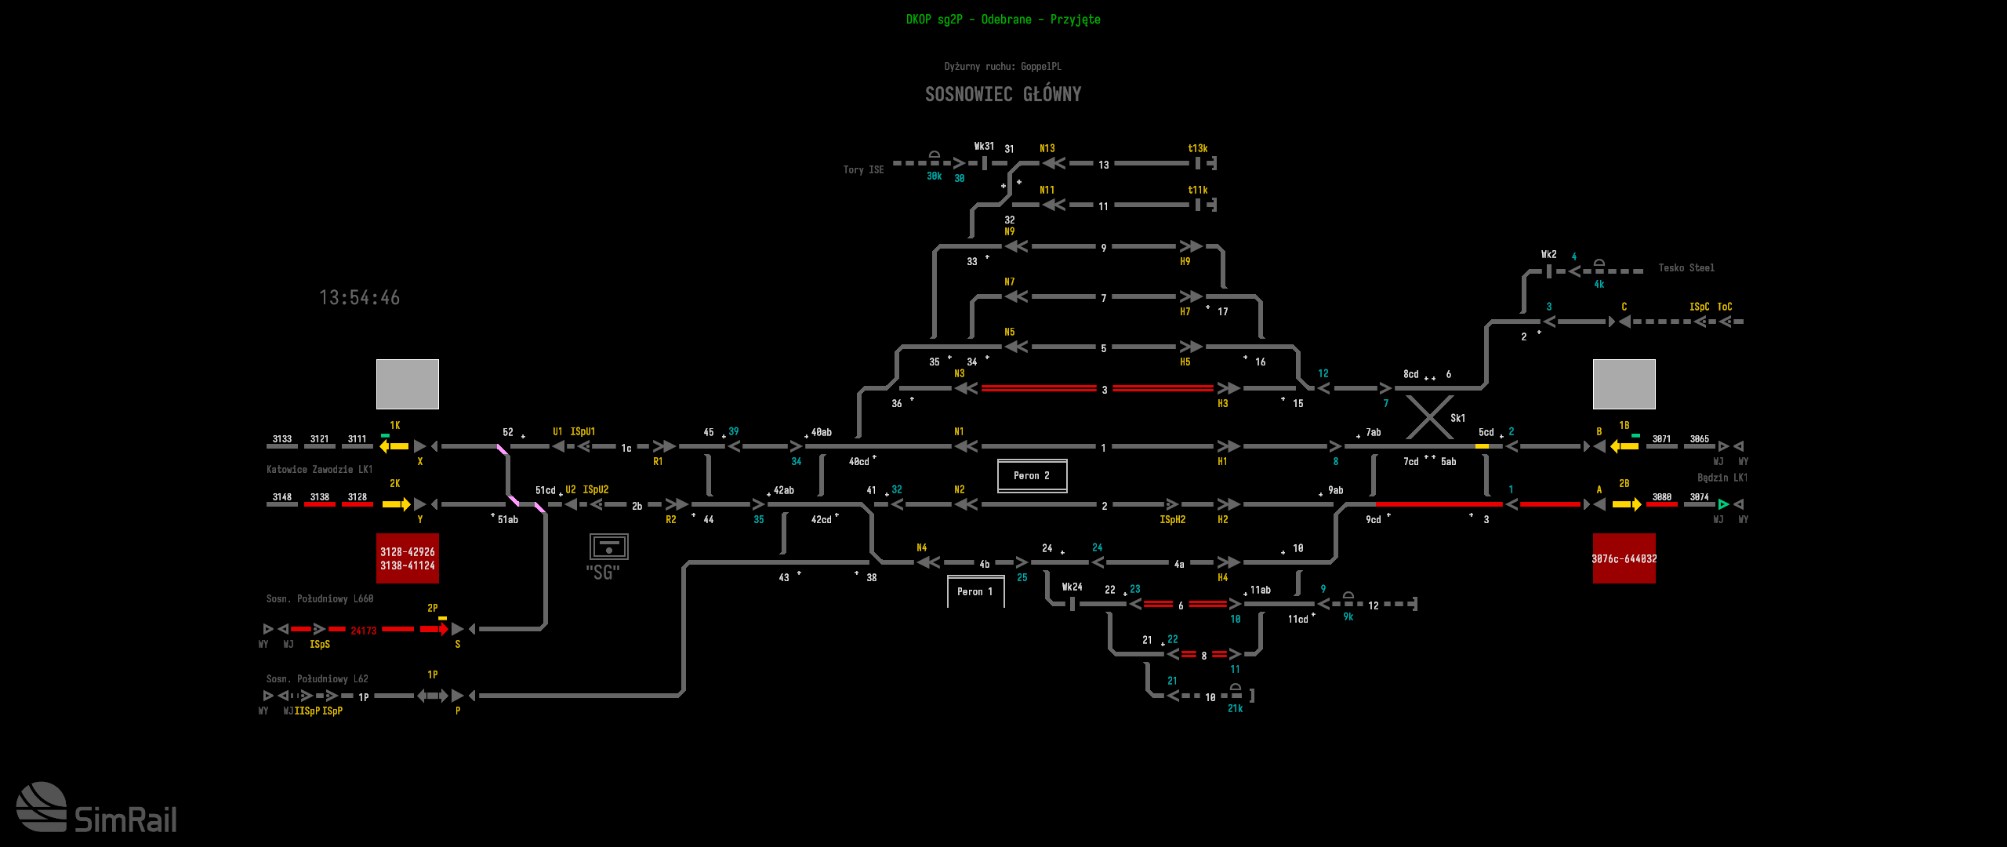
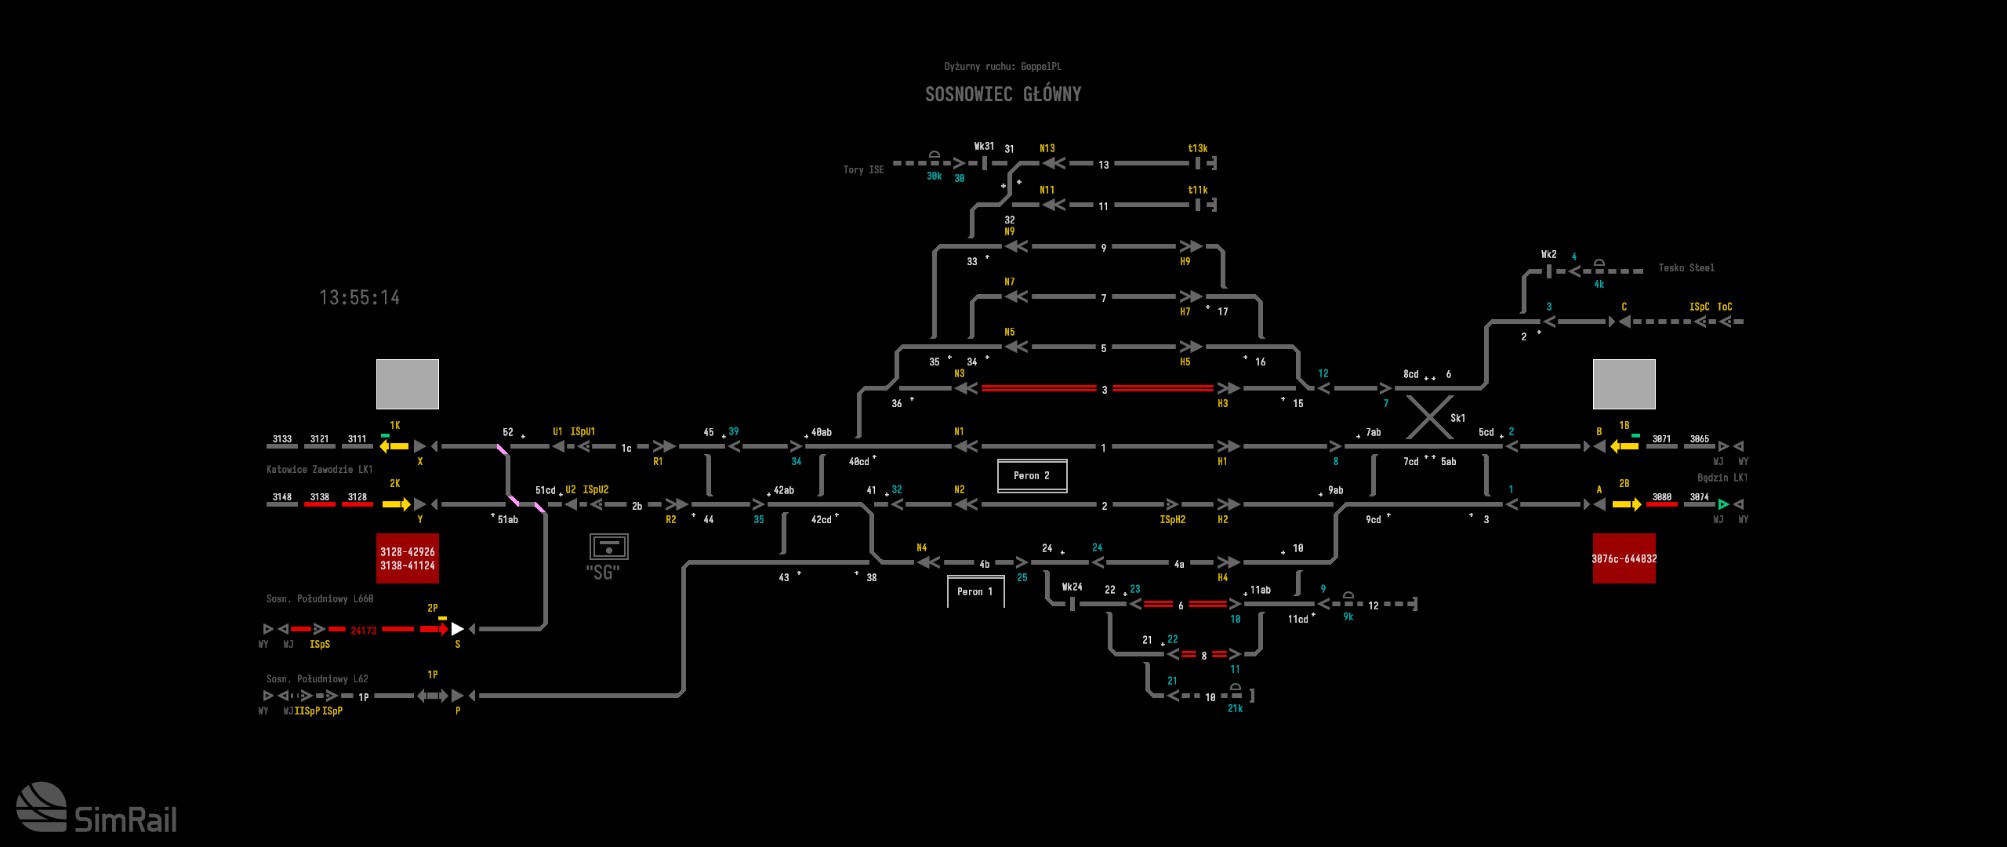
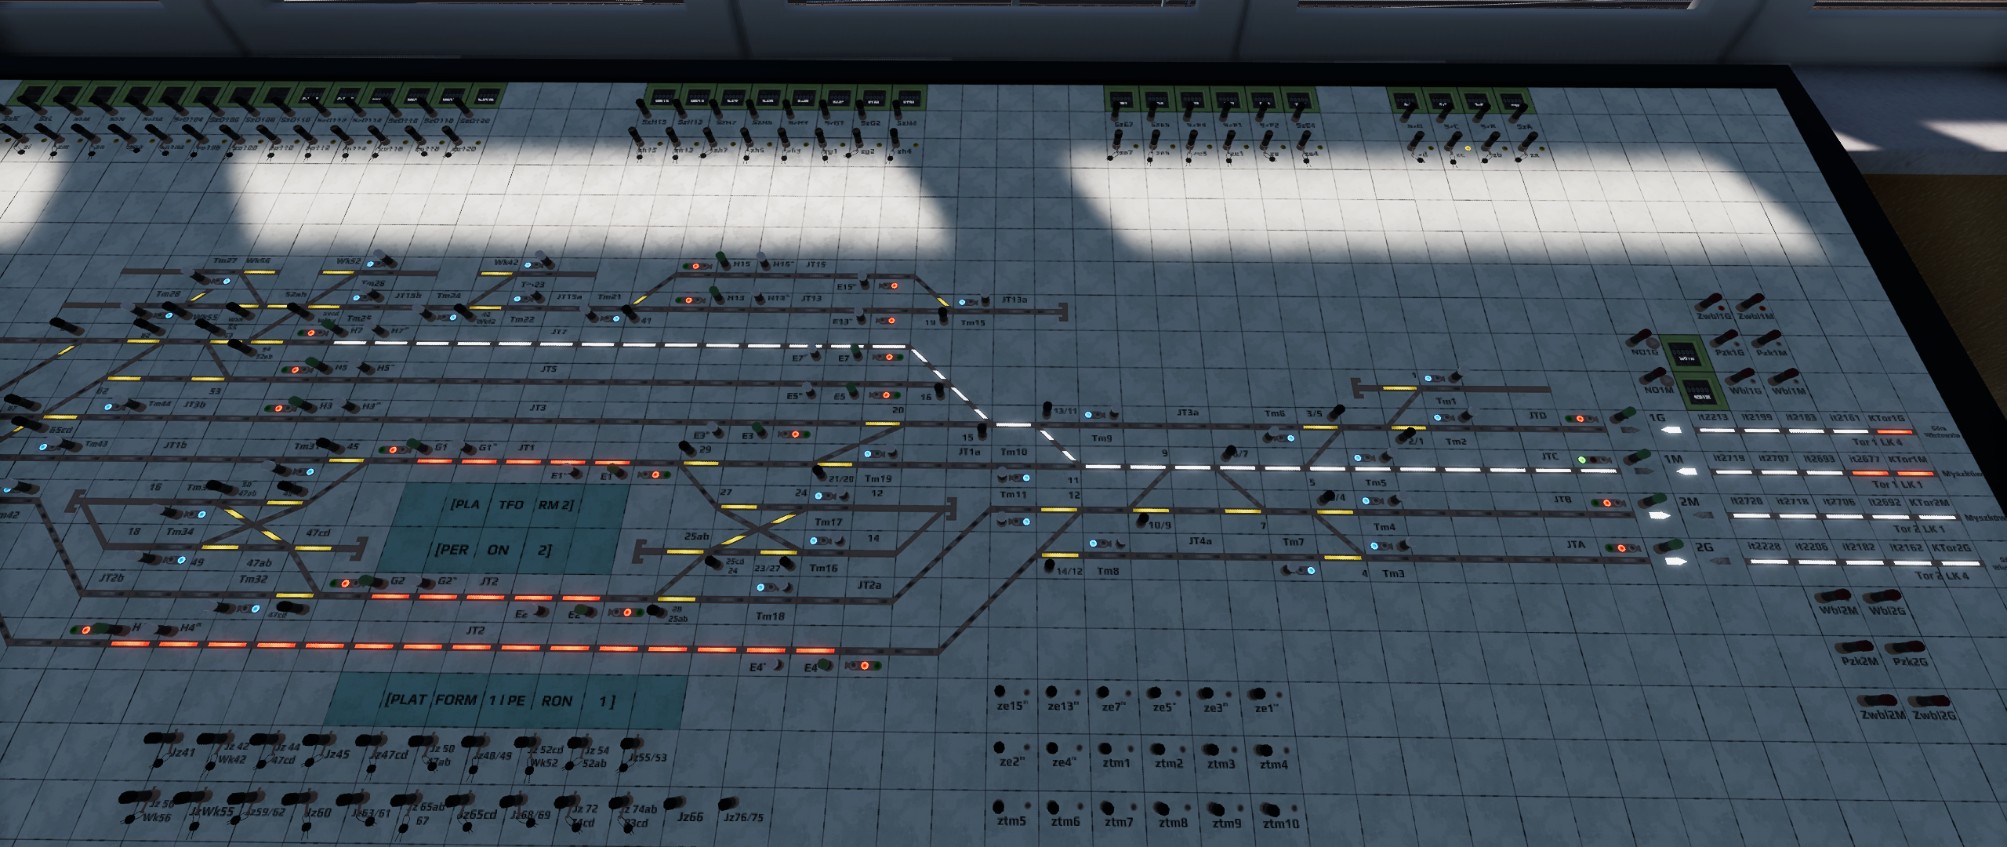
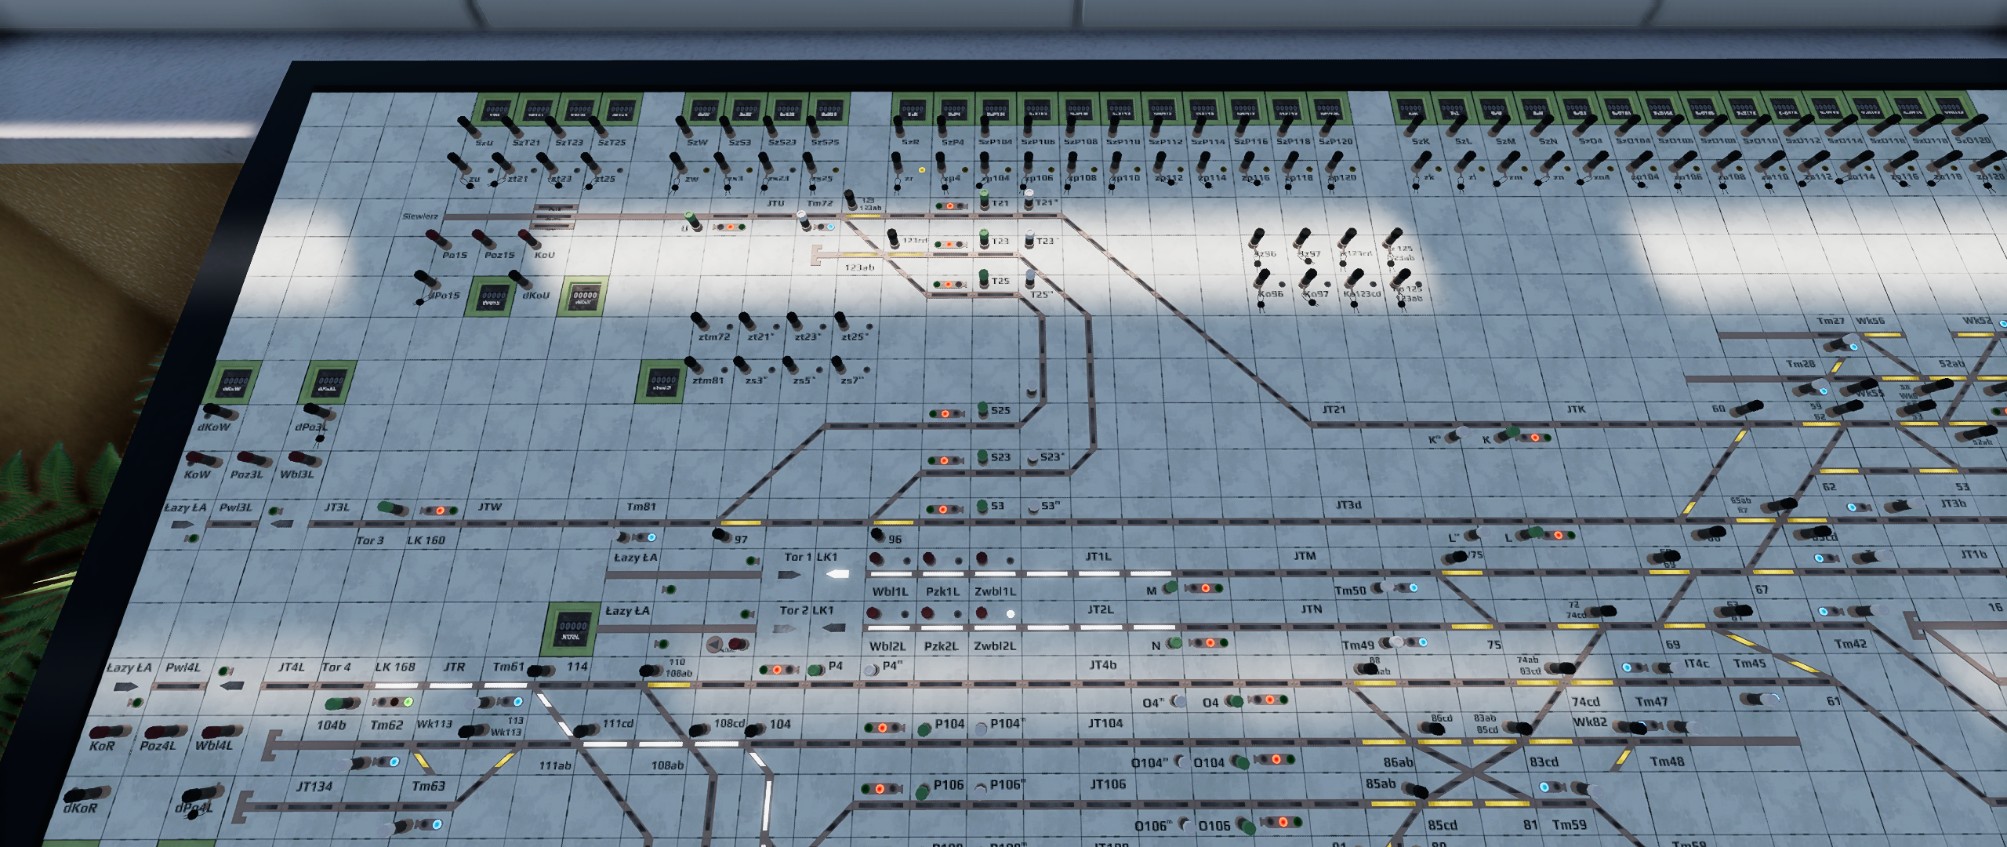
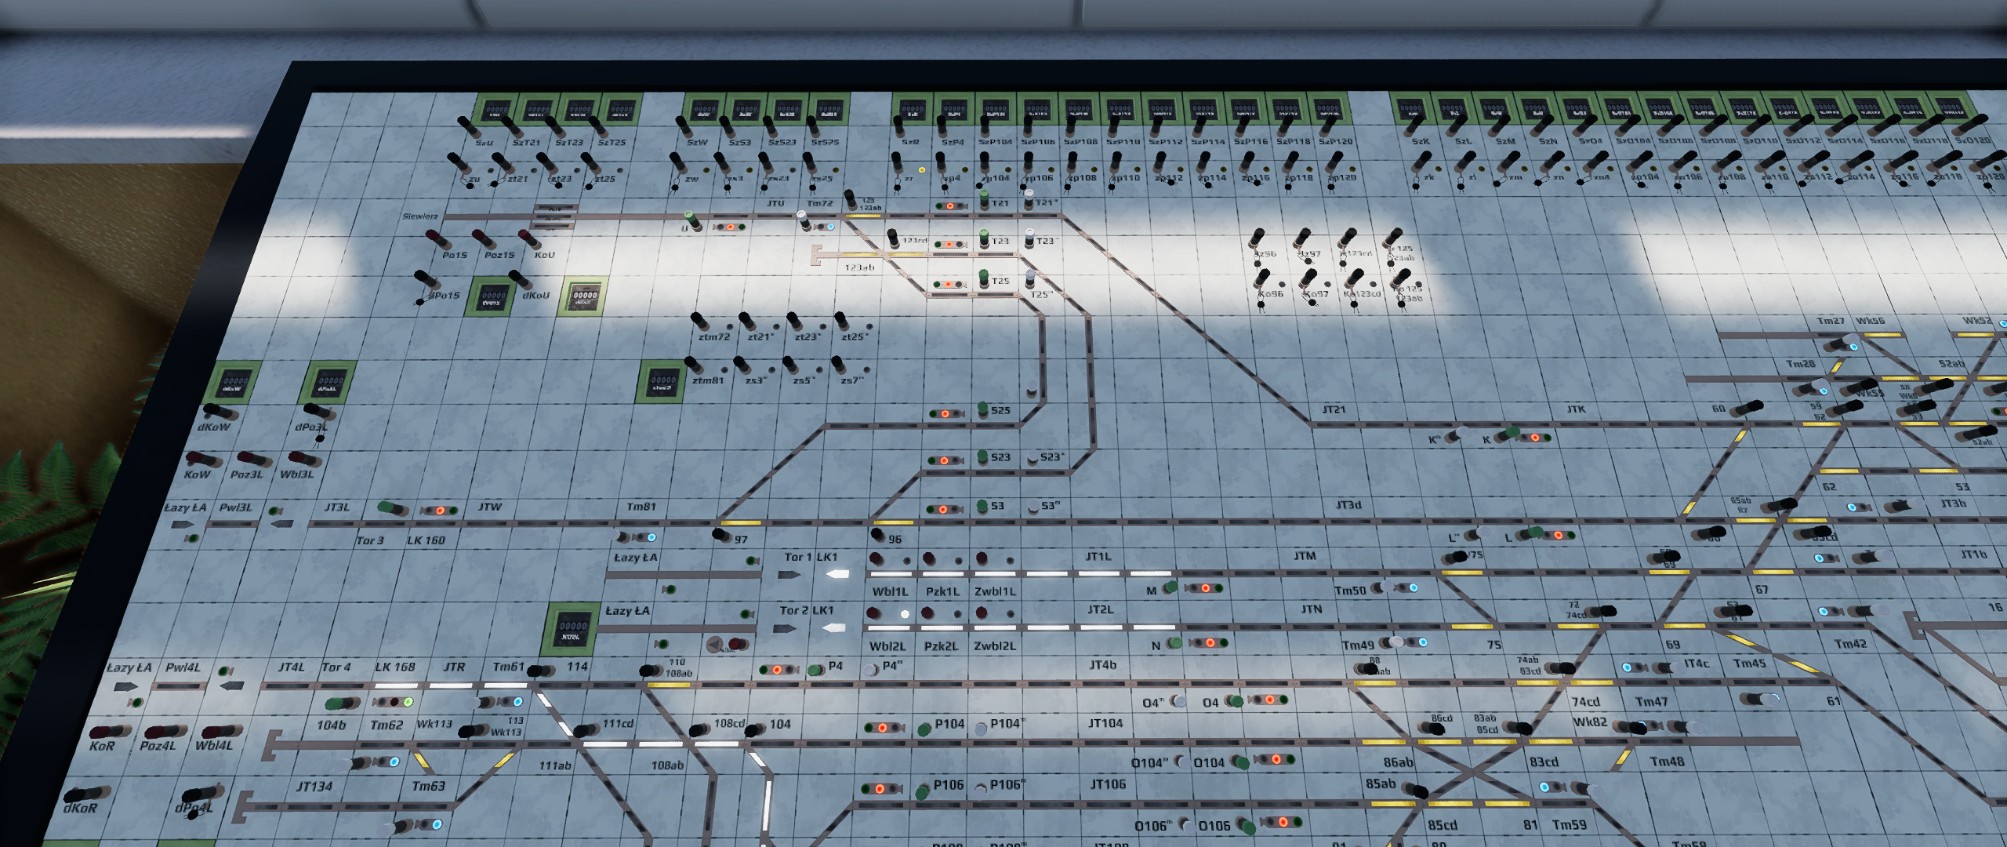
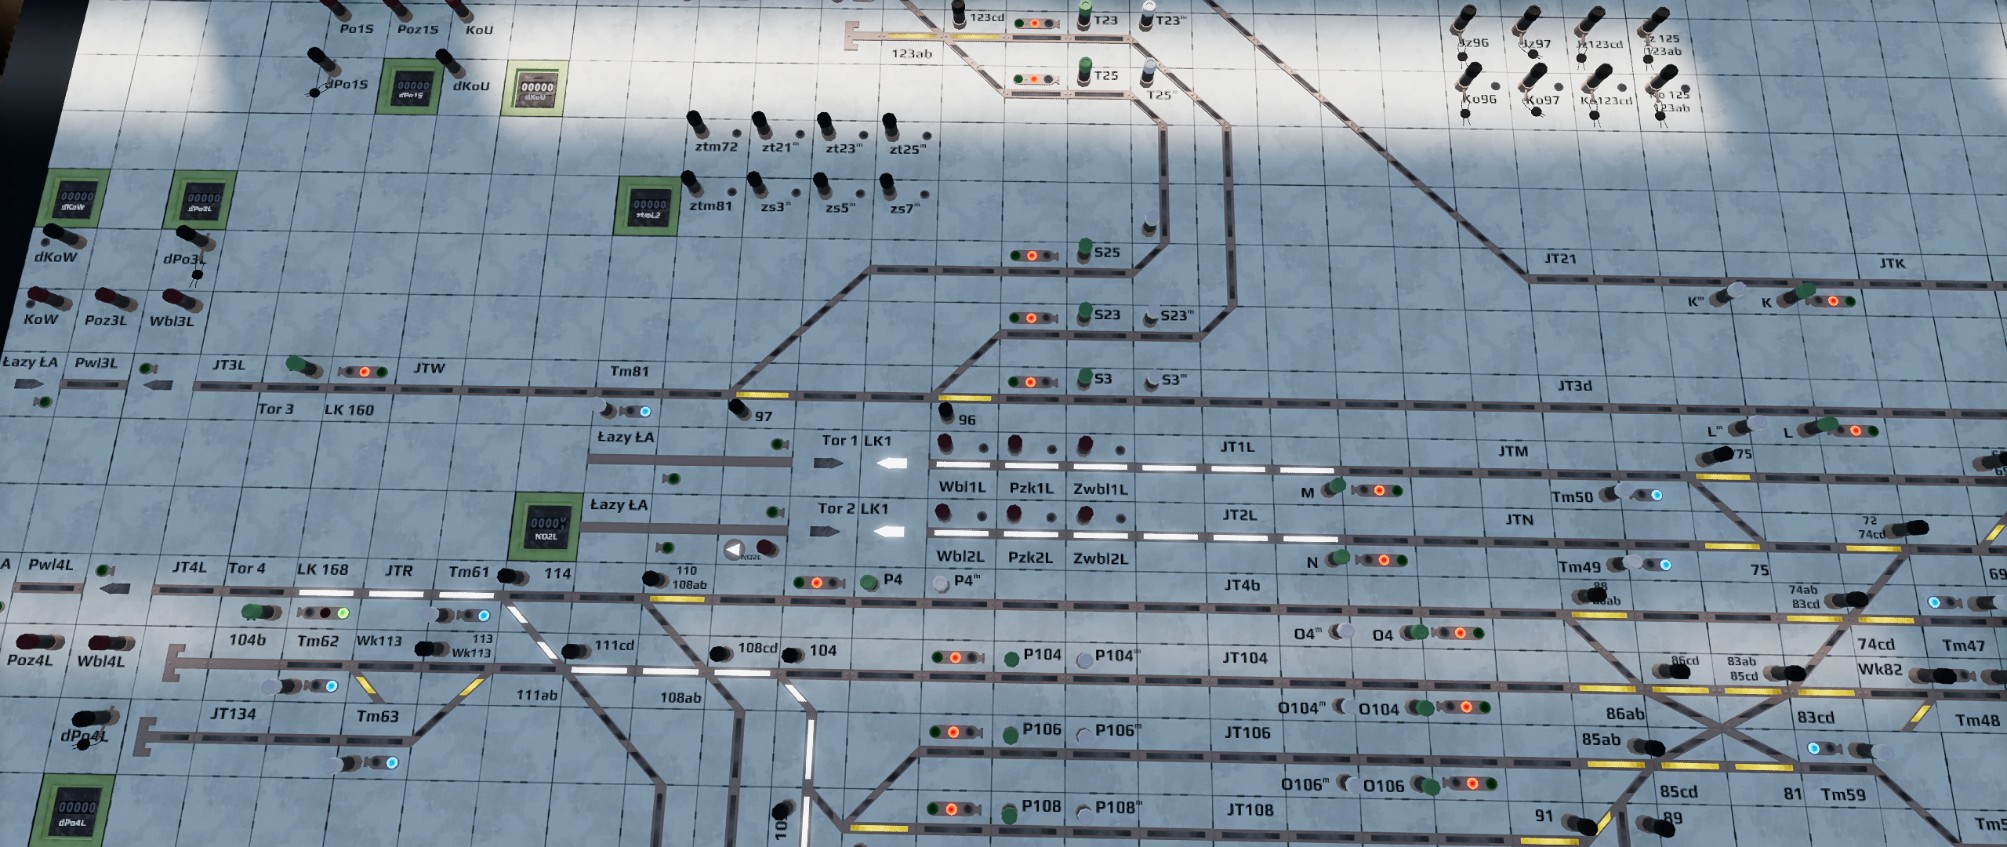
Controlling train traffic using computer devices
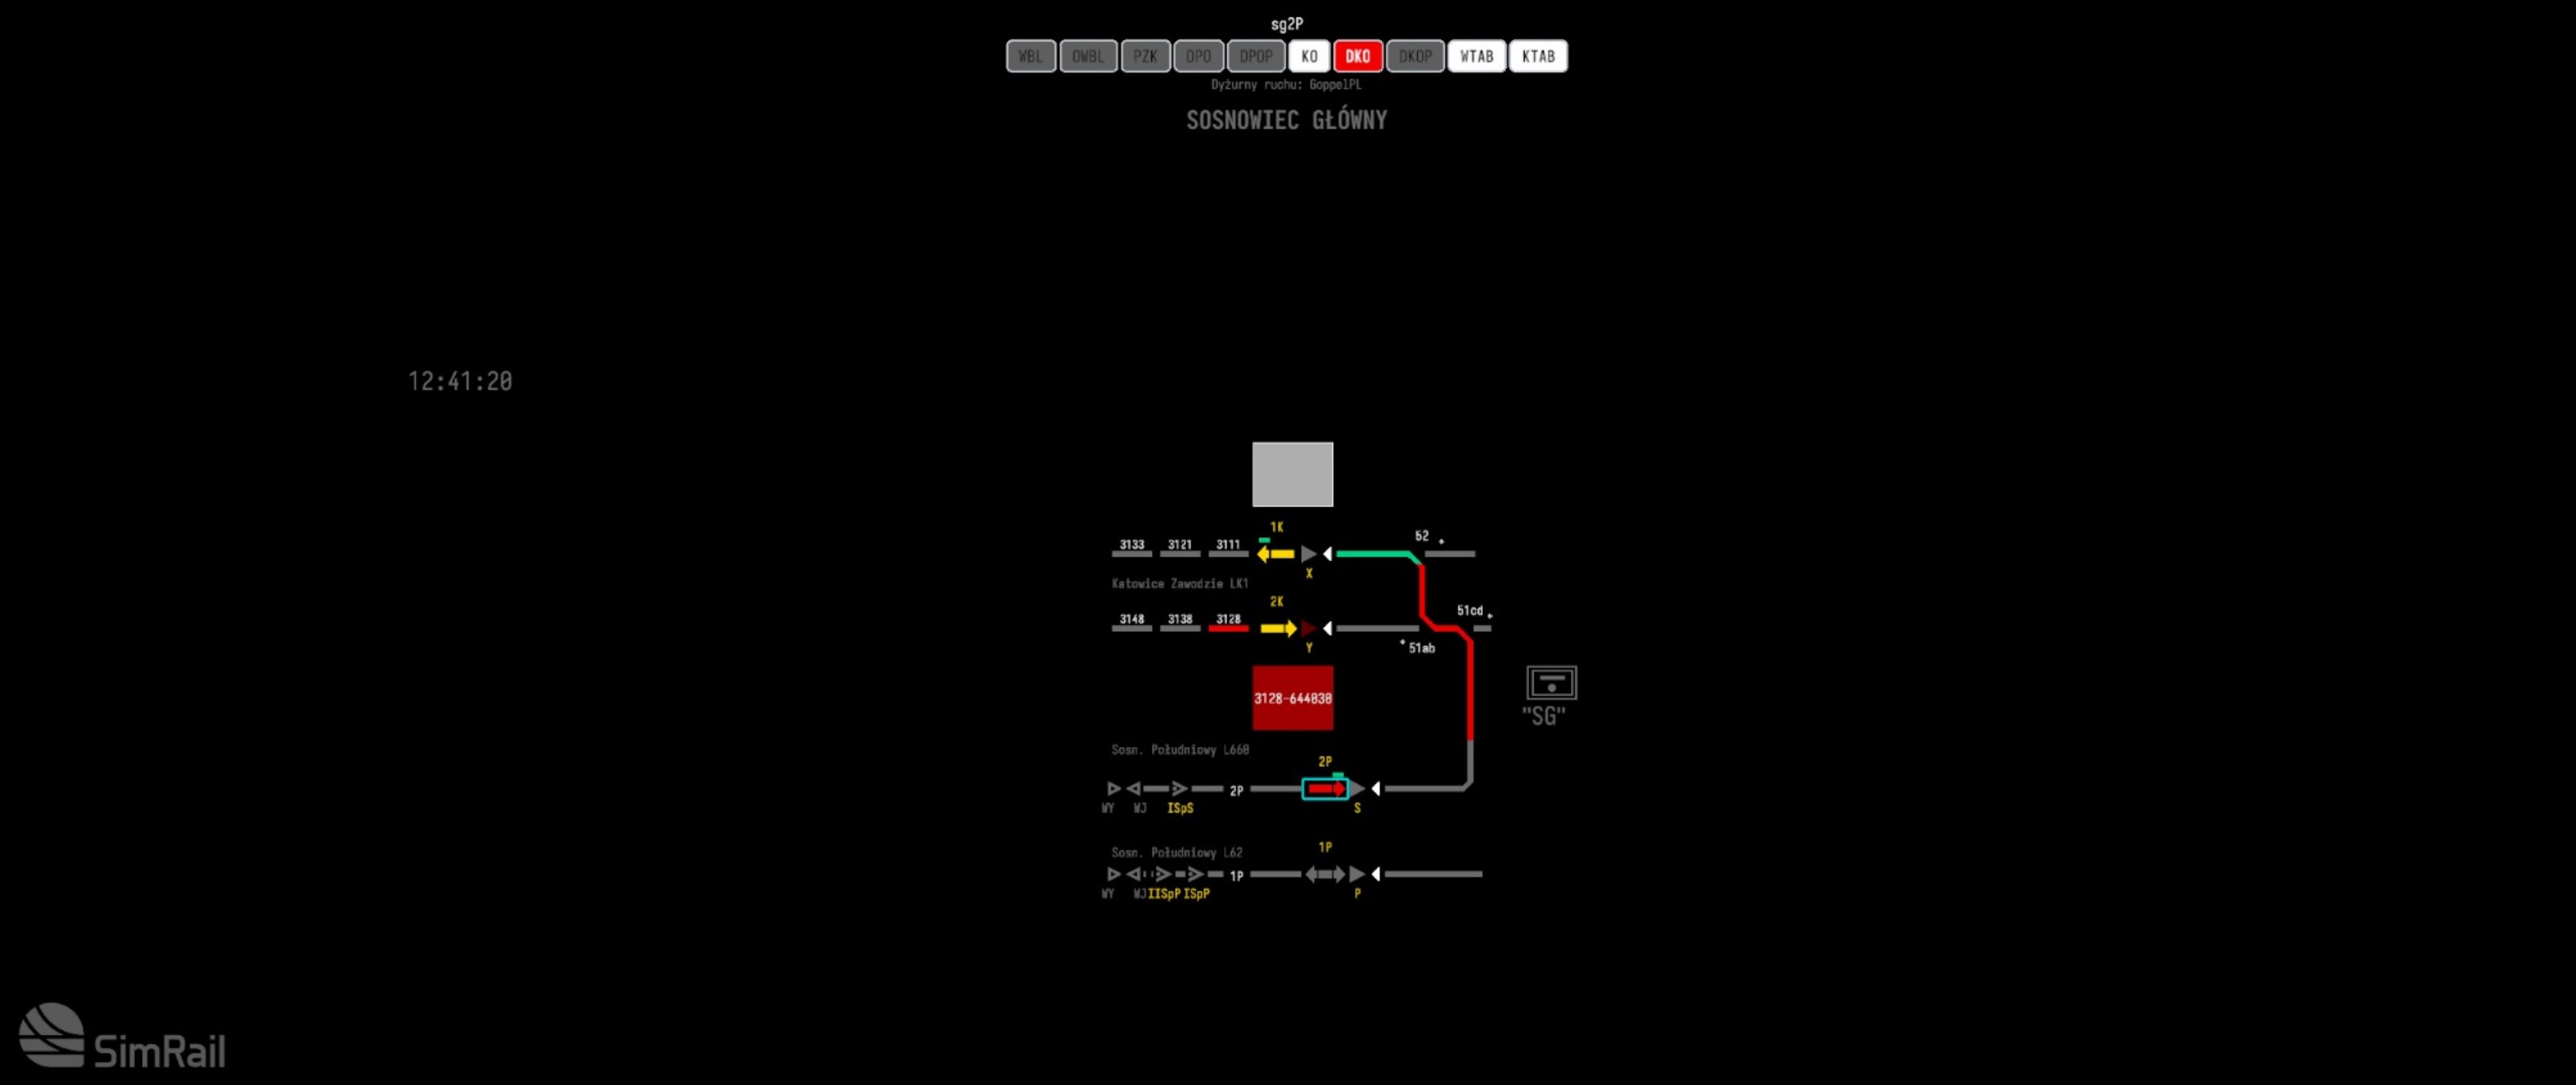
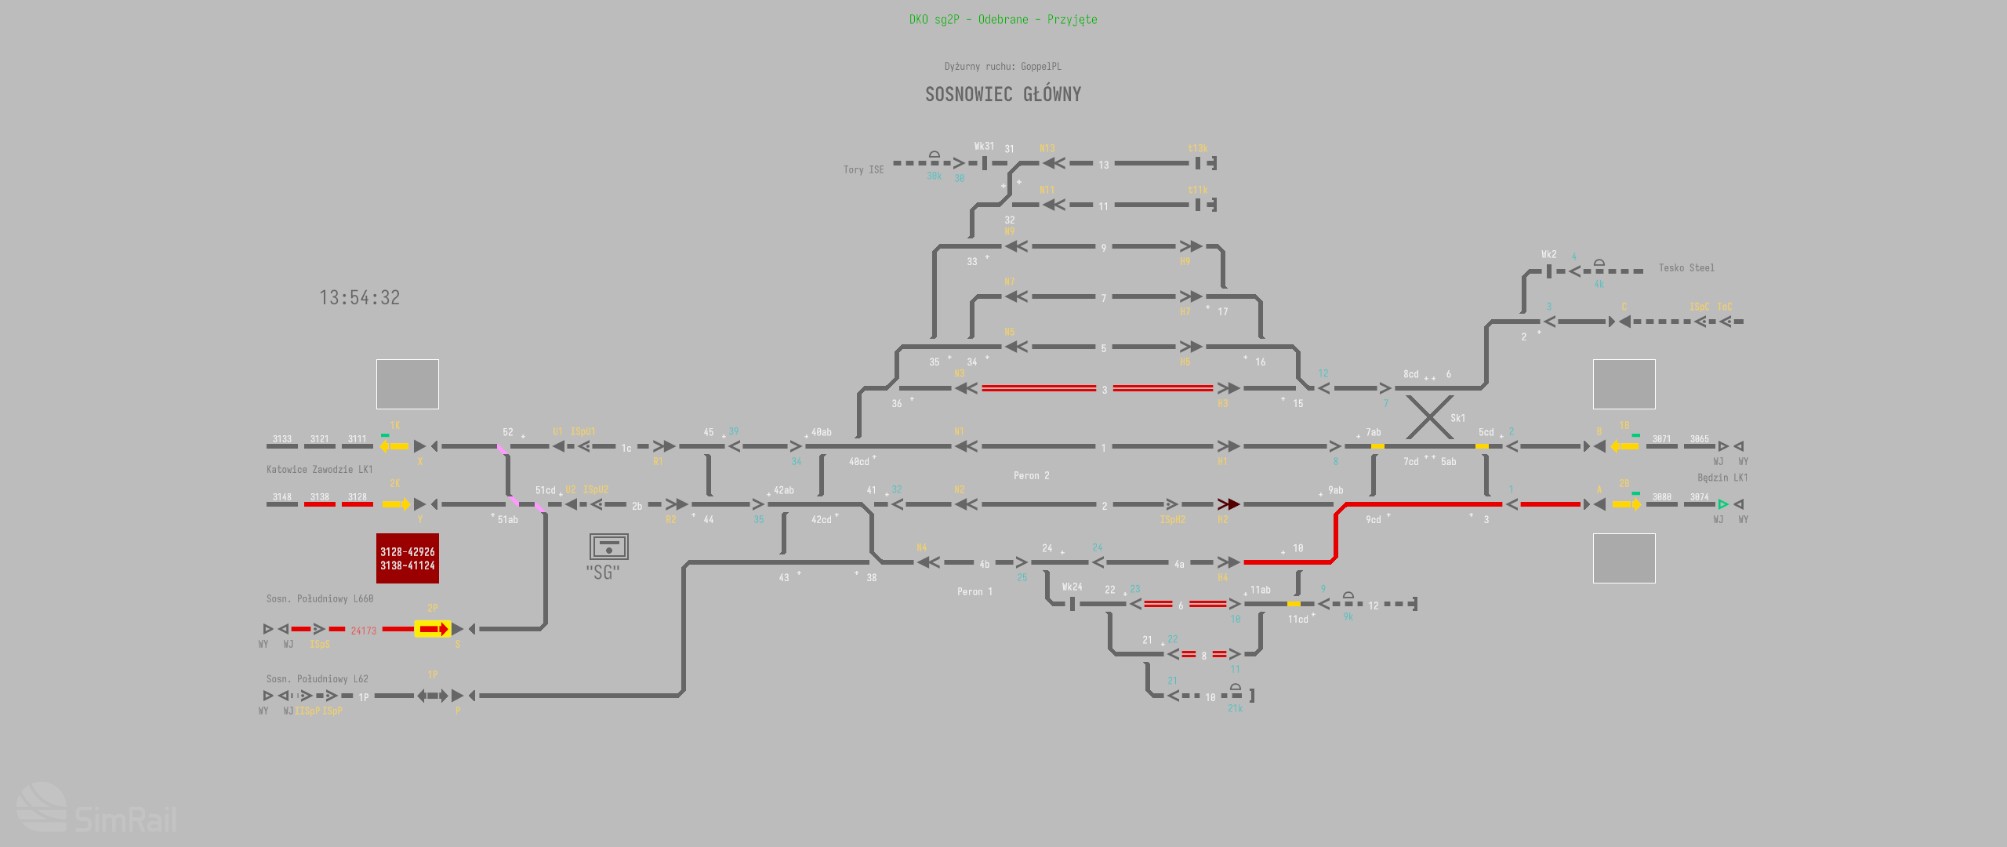
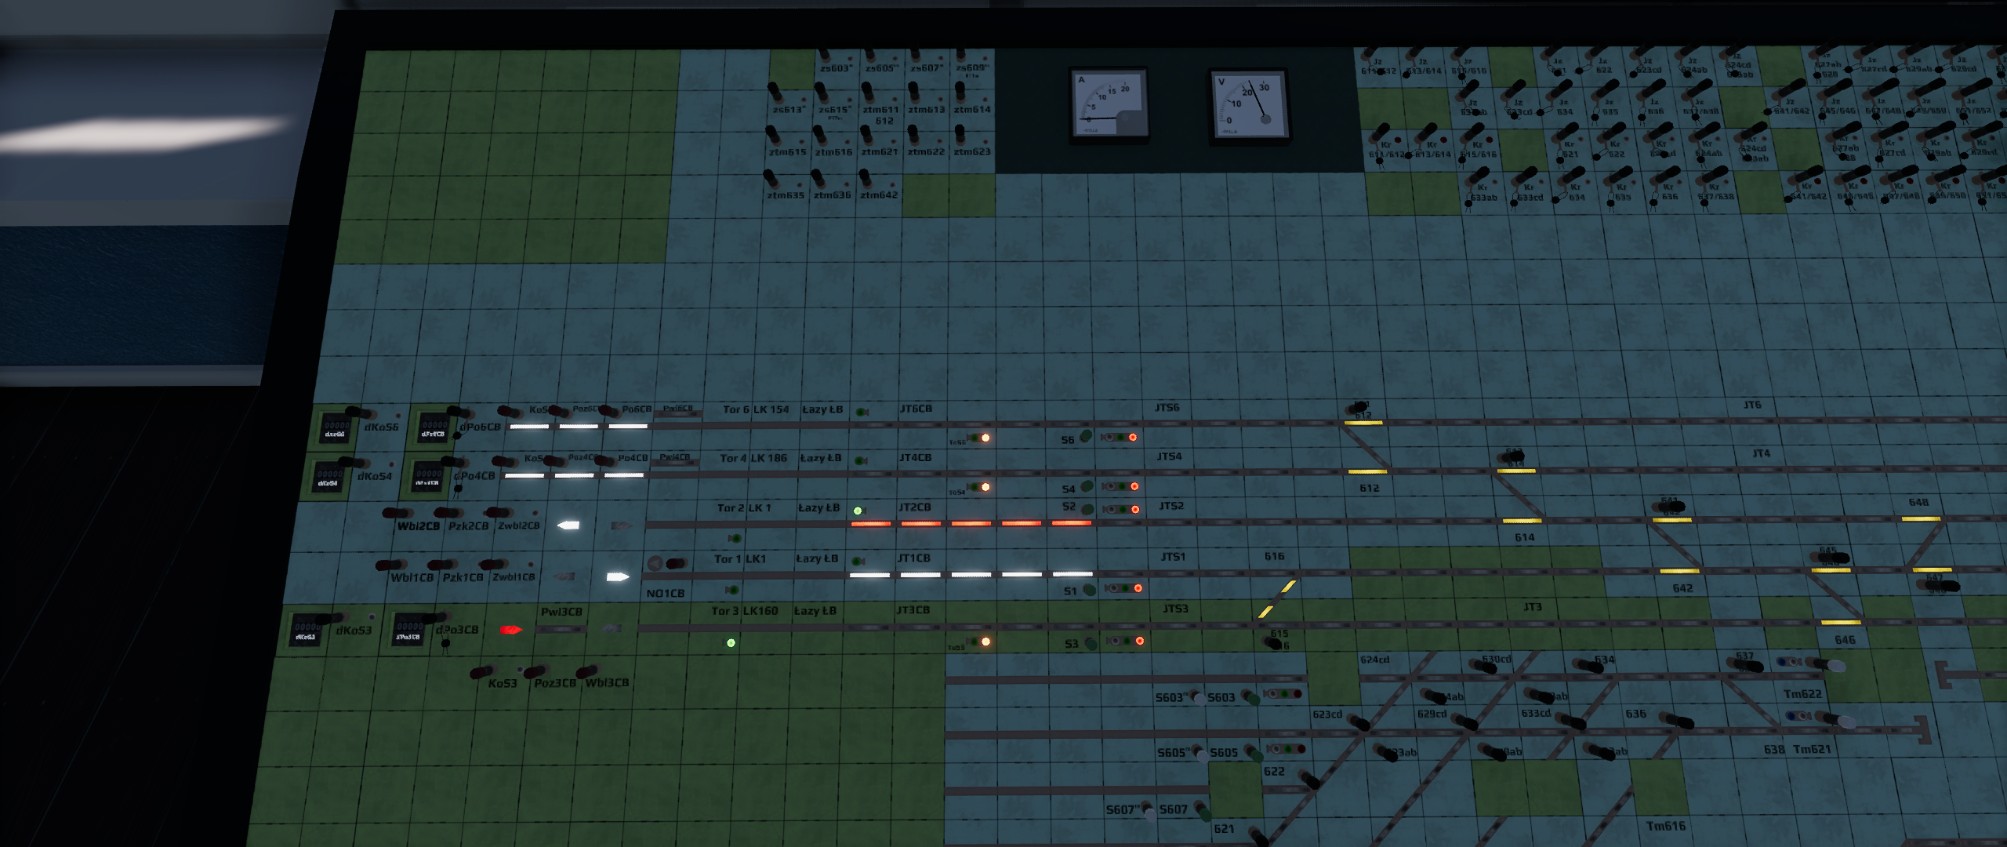
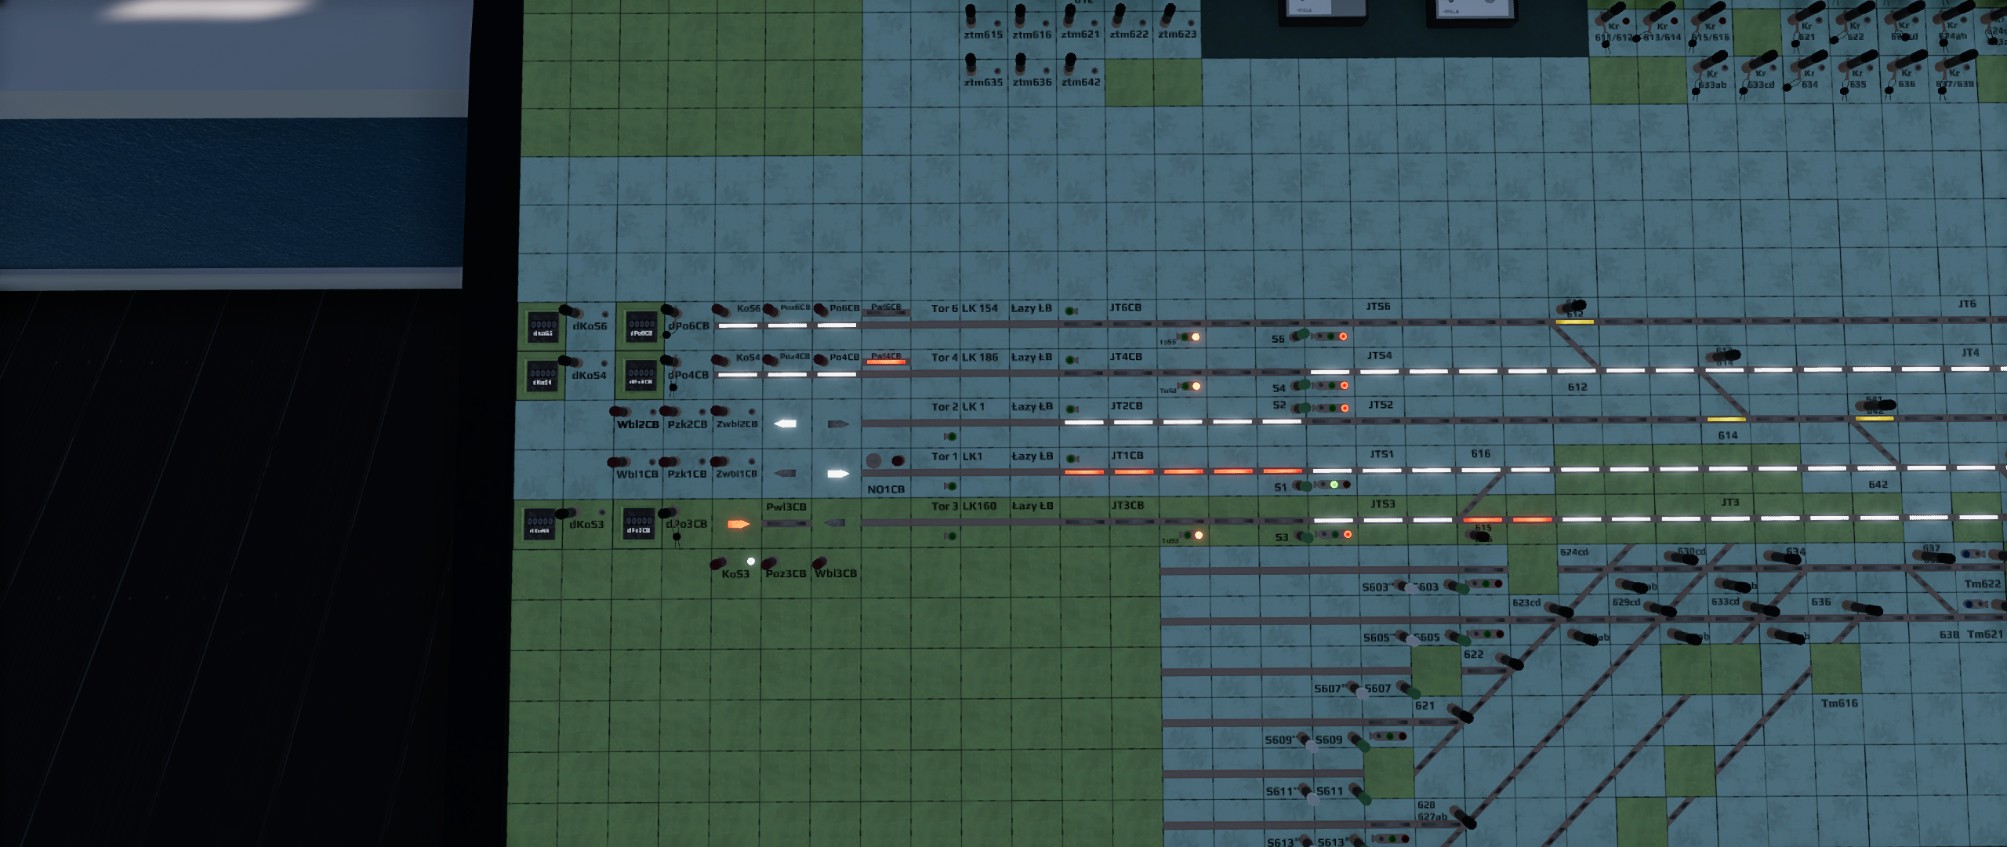
Some of the symbols seen on the computer device’s screen:
| Ikona symbolu | Znaczenie |
|---|---|
 |
vacant line and the interlocking directio |
 |
line and interlocking direction |
 |
line with no interlocking direction set (with ability to do so) |
 |
vacant section and its number |
 |
occupied section and its number |
 |
closed track |
 |
track with active signal route |
 |
track behind a “stop” signal, a “buffer route”. |
 |
a switch secured in position and its number |
 |
track occupation - section number and number of the train occupying it |
 |
an open level crossing, controlled by the dispatcher (creating a signal route through it is impossible) |
 |
a closed, secured level crossing, controlled by the dispatcher (creating a signal route through it is possible) |
 |
a closed level crossing, controlled by the dispatcher, temporarily unlocked (creating a signal route through it is possible, as well as opening the boom gates) |
  |
a dispatcher-controlled signal and its name |
 |
a signal that cannot give “proceed” signals, only “stop” and “Sz” |
 |
station exit |
 |
a shunting signal and its number |
  |
a derailer with its number and state |
Tracks with automatic linear block
Arrivals
To let a train arrive at the station, select the corresponding entrance signal (next to interlock arrow, showing the direction of train’s travel).
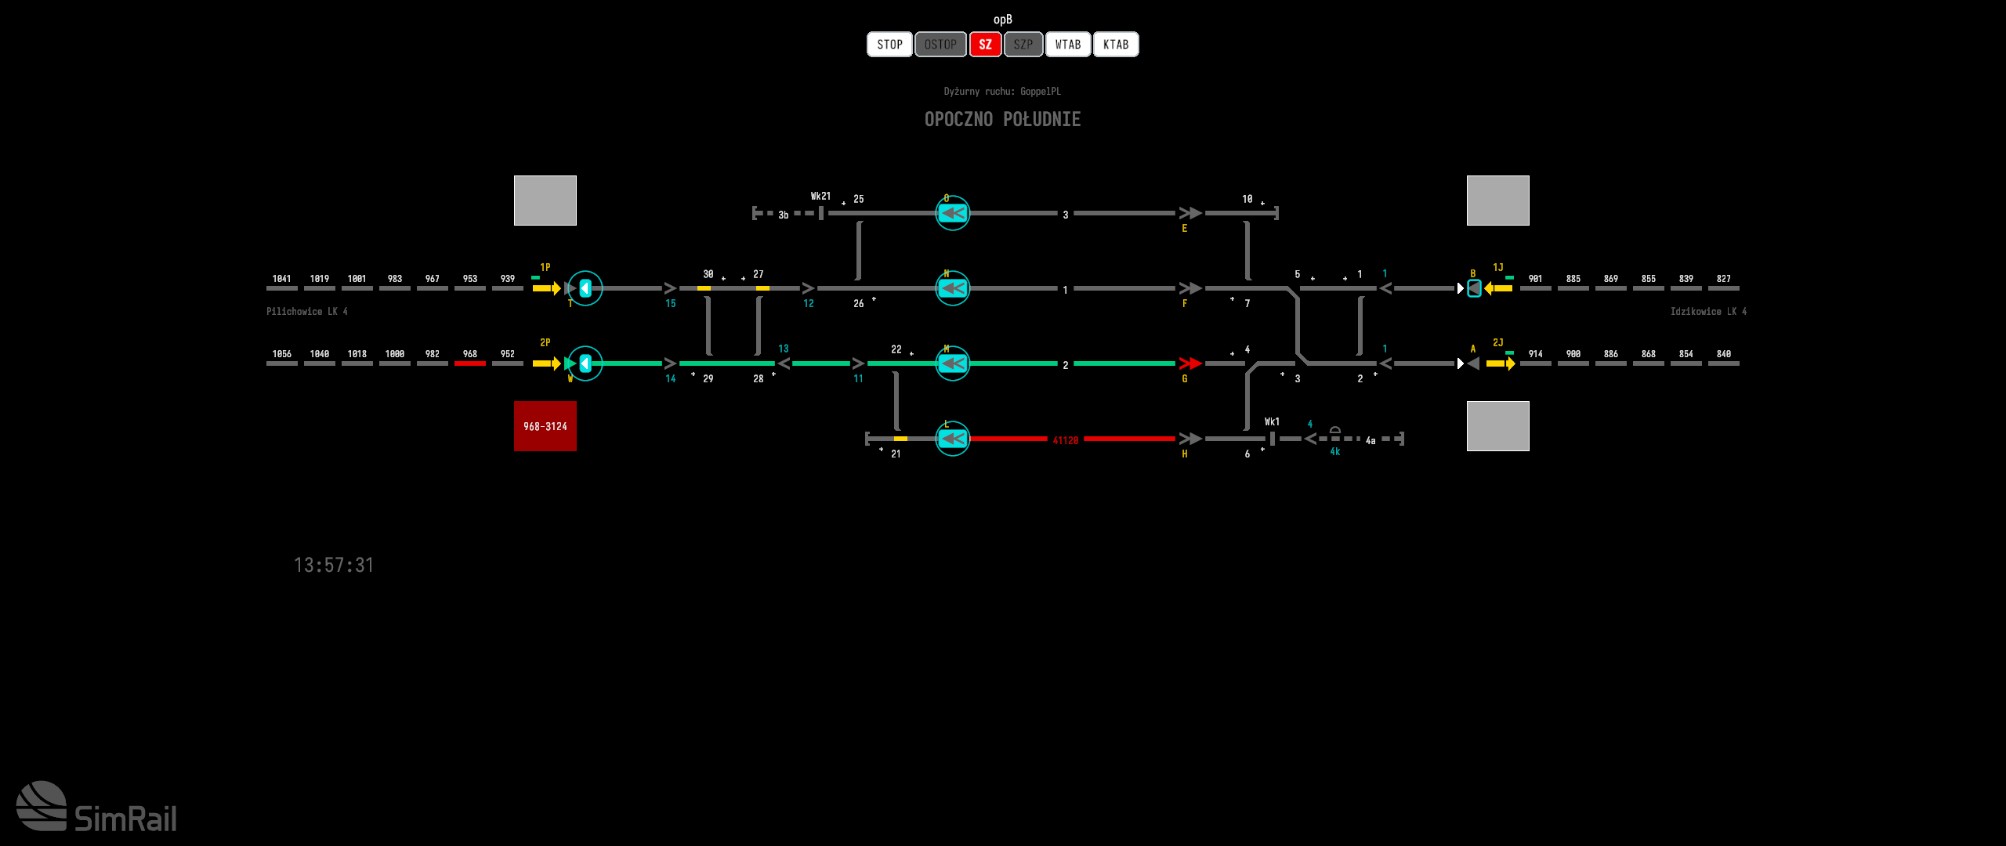
The signals you can route to will highlight in blue. Choose one and confirm the selection with “PRZEBIEG POCIĄGOWY”, following with confirmation command “WYŚLIJ”. The switches and security devices will begin their work, resulting in a valid signal route and a “proceed” signal.
Departures
Before dispatching the train further, make sure that the interlock direction is set correctly, and at least one section is free, so at least one section behind the interlock arrow is grey. With these conditions met, select the train’s exiting signal - all possible exits will highlight. Choose the appropriate one and select “PRZEBIEG POCIĄGOWY”. The switches and security devices will begin their work, and when everything is ready, the exit signal will show “proceed”.
Passing
Some stations allow the trains to pass without stopping. When setting the route combine the Departures first, with theArrivals.
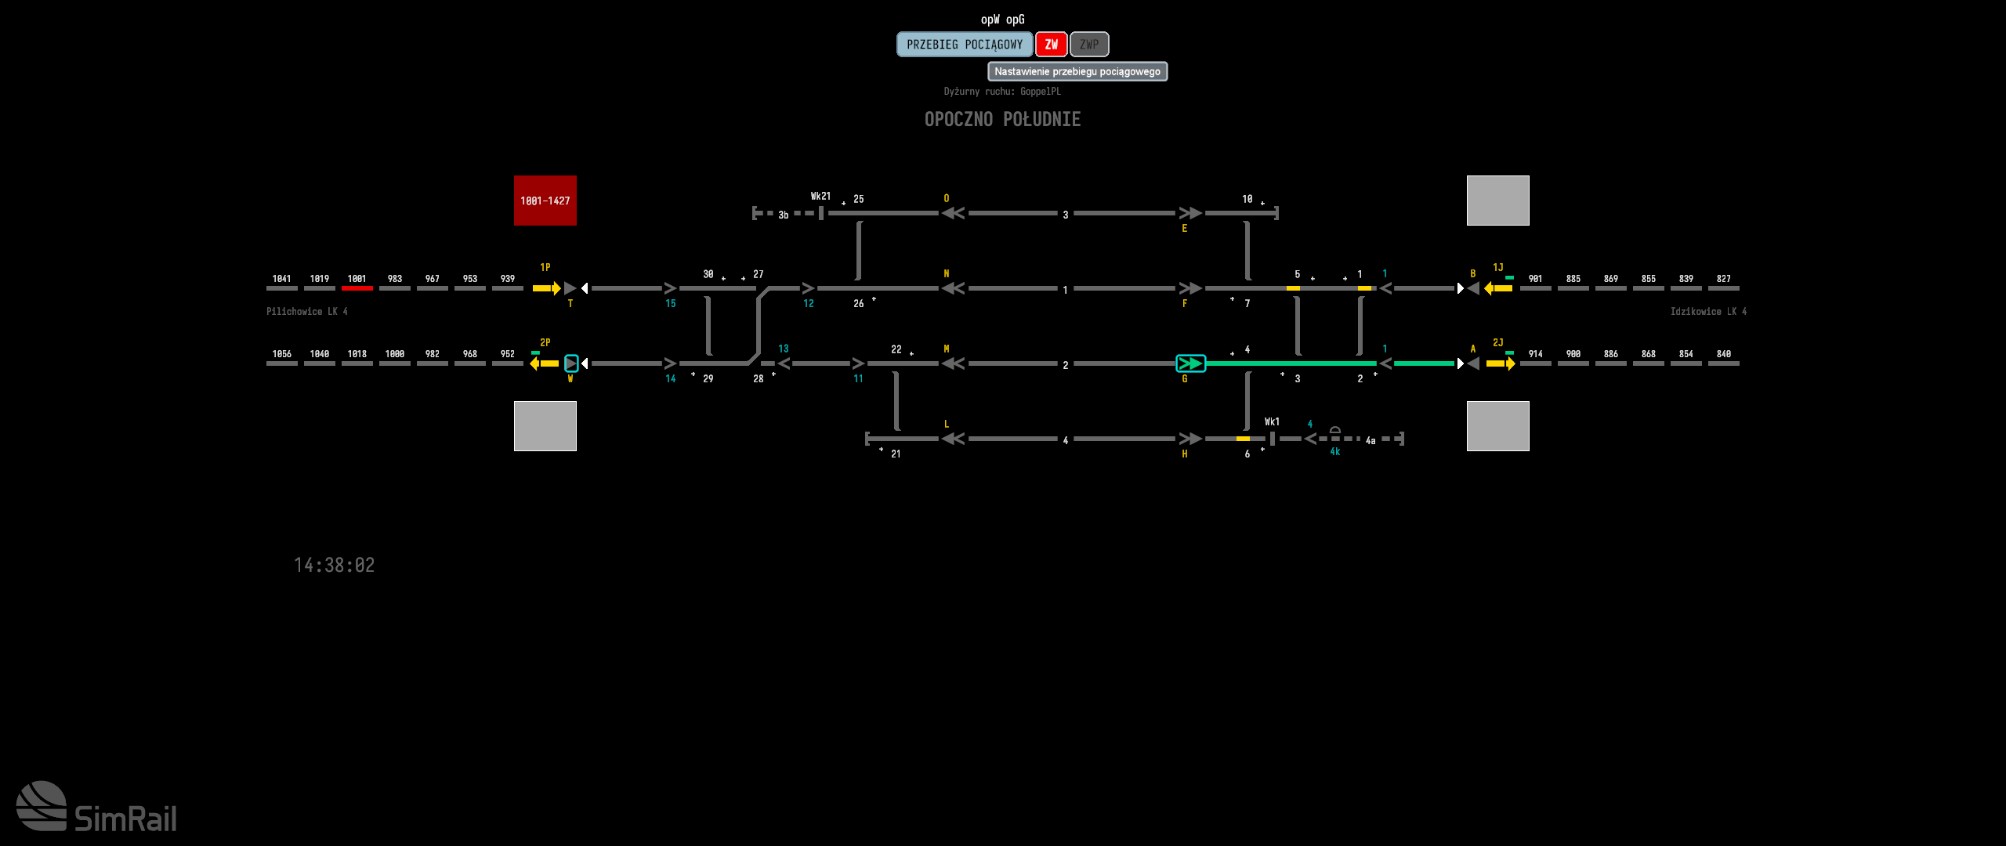
Releasing train routes
Should you set a wrong signal route by mistake (ie. mistake a train stopping at the station for a passing one), there is a way to terminate a signal route. To do so, redo the setting procedure – click on the first signal, then the one the wrong route leads to, and then the “ZD” command. The signal will instantly turn red, but the route will remain secured for the next 90 seconds to secure the time for the train to stop safely and prevent the switches to be switched under the rolling stock. After the 90 seconds pass you’ll be able to set the route again.

Releasing the interlock’s direction
To prepare the interlock to change its direction, click on the interlock arrow and use the “ZWBL” command. If the line is free, the arrow will begin to blink. When the interlock is deactivated, the arrow will become gray and showing both sides.
Issuing the interlock setup command
To activate the interlock in the “away” direction, click on the inactive interlock arrow and choose “WBL”. The interlock arrow will begin to blink, awaiting approval from the neighboring dispatcher. After the approval is given, the arrow will become steady and the interlock will become active for the chosen direction. You can use this method to send trains on the opposite track.
Alternate traffic management
When a regular “proceed” signal cannot be given, the supplementary Sz signal is used. With the Sz signal the signal routes are not confirmed – the switches are set manually via the “PLUS” and “MINUS” commands, and then locked with the “STOP” command. With the signal route manually set up you can proceed to issuing the supplementary signal Sz. Select “SZ” for the regular (right) or “NSZ” for the opposite track. In order to notify the dispatcher that he’s about to issue a special command, the background turns gray. Confirmation command (either “SZP” or “NSZP”) unlocks after five seconds – use this time to check the signal route again. Should you notice a mistake after initializing a special command, you can use “OPS” to discard the initialization. When everything is ready, confirm the command with “SZP” or “NSZP” – the background will return to black, and the supplementary signal Sz will be issued. The supplementary signal can be terminated after being issued too. To do so, click on the station’s name on top of the screen and choose “OSZ” command. If you don’t do it the signal will terminate automatically after 90 seconds. When the train leaves the switches remember to unlock them using “OSTOP” on these you’ve secured.
Lines with semi-automatic interlock
When dispatching on the semi-automatic interlock, you need to use end- and starting blocks, as well as to communicate with your neighboring dispatcher in order to agree if the line is clear.
Arrivals
After confirming to the neighboring dispatcher that the line is free you should expect the interlock direction light blinking white. After using the “PZK” command the neighbor will be able to dispatch a train in your direction. Following the train’s arrival the interlock won’t shut down, and its arrow icon will turn red.
Now you need to use the end lock with the “KO” command to confirm the train’s arrival. Now the interlock will return to idle.
Departures
In order to receive an approval to turn the interlocking on, you need to call the neighboring dispatcher and ask if the route for train number via track number is free.
After receiving such approval, use the “WBL” command to set the interlock up. When the neighboring dispatcher allows to, the interlock will turn on and it will become possible to dispatch a train in his direction. When the train arrives at that station, the dispatcher releases the end block and the interlock returns to idle.
Running on substitute signal - entering the station
When a regular “proceed” signal cannot be given, the supplementary Sz signal is used. With the Sz signal the signal routes are not confirmed – the switches are set manually via the “PLUS” and “MINUS” commands, and then locked with the “STOP” command. After confirming that the way is free with the neighboring dispatcher, you should expect a demand to allow changing the interlock’s direction. Only when you allow it by the “PZK” command, the neighbor can dispatch a train to you. When a train appears on the line between the stations, use the “DKO” command and after five seconds confirm it with “DKOP” to expediently lock the ending block.
This way the interlock is able to send a “KO” command without an entry signal being issued, and a yellow box will appear over the red interlock arrow.
Now you can issue the supplementary signal Sz.
When the train vacates a section behind a signal, the “KO” command will unlock. After issuing the “KO” command the interlock will return to idle.
Running on substitute signal - exiting the track
When a regular “proceed” signal cannot be given, the supplementary Sz signal is used. With the Sz signal the signal routes are not confirmed – the switches are set manually via the “PLUS” and “MINUS” commands, and then locked with the “STOP” command. After turning on the interlock with the “WBL” and setting the Sz signal with “SZ”/”NSZ” and “SZP”/”NSZP” commands, when the train departs, click on the interlock arrow and use the “DPO”, and then, after five seconds “DPOP” to confirm the command. This way we send an information about the train’s departure. When the train arrives at the neighboring station, the dispatcher there releases the end block and the interlock returns to idle.
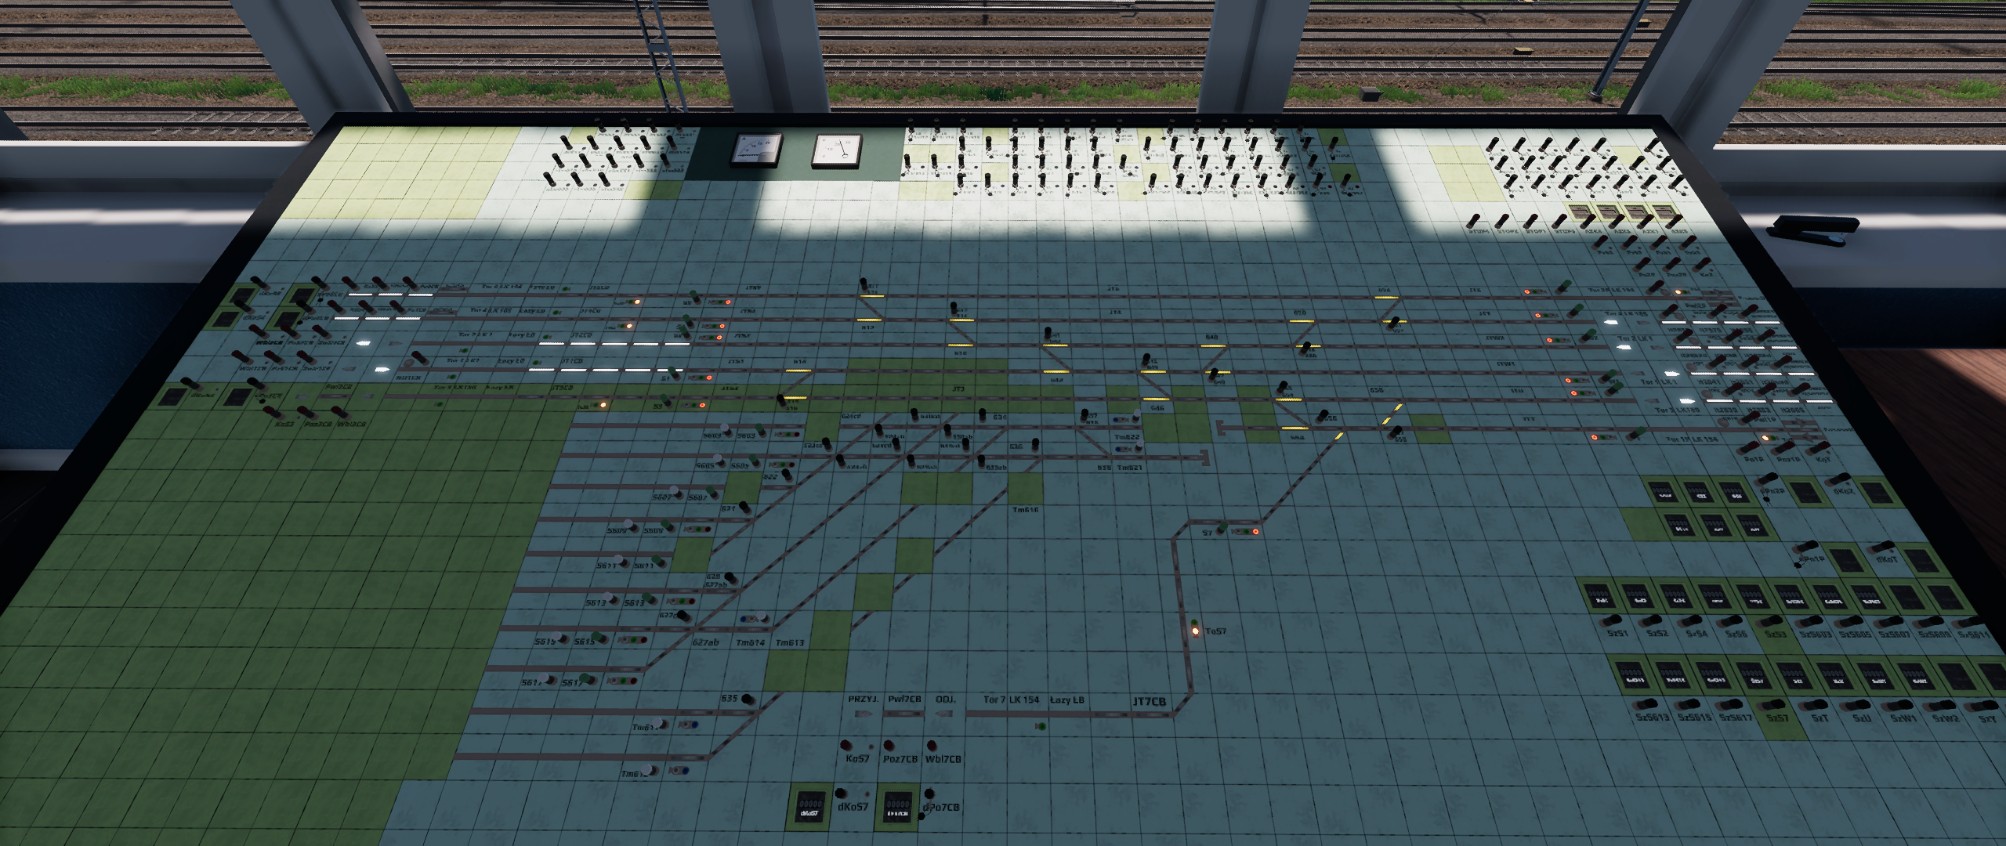
Controlling train traffic using relay devices
The relay dashboard’s buttons and switches are as close as possible to the system they are controlling. The buttons are labeled with their function’s shortcut or with the name of the device they operate. Bear in mind that the buttons may be pushed (LMB) and/or pulled (RMB). All operations triggered by the buttons take a while, and the buttons must be held active for about one second. All signal routes are set manually, switch by switch, and you must be sure the route is correct before using a signal button. Apart from different equipment and its limitations, the dispatching rules are the same, and the orders are similar to the computer ones.
Some of the dashboard’s elements are:
| Element | Meaning |
|---|---|
 |
A vacant section. |
 |
A section being part of a signal route or a vacant automatic interlocking section. |
 |
A section occupied by a train. |
 |
A switch in its basic position and its control button. |
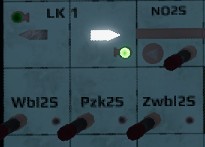 |
Interlocking direction light and control buttons: Wbl – setting the interlock direction (“away”) Pzk – giving permission to change the interlock direction Zwbl – releasing the interlock’s direction NO – train departing on the opposite track” button (setting the opposite track departure sign on the signal) the green light indicates that a departure signal was given at the neighboring station |
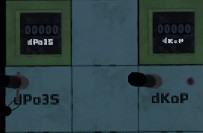 |
Sealed buttons and their counters: dPo – expedient starting block locking (acknowledging the train’s departure) dKo – expedient ending block locking (acknowledging the train’s arrival) |
 |
Sealed signal route termination button and signal route confirmation lamp. |
 |
Supplementary signal counter and button. |
 |
Shunting signal button with its status lamps. |
 |
Signal button with its status lamps. |
 |
Shunting route termination button with its lamp. |
Preparing train route and signaling on semaphore
In order to prepare a signal route you need to use switch buttons on the signal route. The switch slits light up in yellow showing the switches’ current setting. After carefully checking the signal route you can approve it by pushing the signal button.
A set, confirmed signal route will light up in white.
Resolving train route
Should the signal route be set wrong, it needs to be terminated. In order to do so, pull on the signal button to set it to “Stop”, and find the sealed signal route termination button. Coming in handy is the signal route confirmation light, right next to the button. If there are several signal routes active you should look for the one labeled “zsemaphore_name”, ie. zK10 or zC. After breaking its seal, pull on the route termination button. The track slits will extinguish, and – only if they turn out unoccupied – the switches can be set again.
Controlling traffic with substitute signal
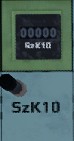
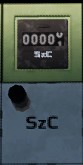
In order to give a supplementary signal Sz, you need to find a Sz button corresponding to the semaphore you want to light it on. The Sz buttons are mostly located on top of the dashboard and are called “Szsemaphore_name”, ie. “SzC”. To give the signal pull on the button. The signal will remain on for 90 seconds or until you push the Sz button. Every supplementary signal is recorded by the counter next to the button.
Dispatching trains on the opposite track
Releasing the interlock’s direction
In order to prepare the interlock to switch its direction you need to find the “Zwbl” button of the track you want to dispatch the trains to, for the direction to be released.
If the line is free, the interlock direction arrow will start to blink, and the Zwbl button light will come on. After the interlock direction is set to zero, both direction arrows will extinguish, and the interlock will become inactive.
Ordering to change the interlock direction
In order to activate the interlock in the direction out, you need to find the “Wbl” button.
After it’s pressed, the “Wbl” light will come on, and the interlock direction arrow will begin to blink in the direction you have chosen, waiting for the neighboring dispatcher to confirm the change. After the confirmation, the light will come on steady and the interlock is active in the direction set.
Dispatching a train to the opposite track
In order to dispatch a train to the opposite track, before using the signal button you need to find the “Opposite track departure” (“NO”) button and use it.
A small arrow next to it will light up, pointing in the departure direction. You can use the signal button now. The arrow will extinguish, and the signal route will set properly for the train.
Letting in a train going on the opposite track
When the interlock direction arrow begins to blink, use the direction change (“Pzk”) button. The arrow will light up steady. Next we use the “Arrival from the opposite track” (“NP”) button. A small arrow pointing in the direction of the arrival will come on and setting an arrival signal will be able. After the train arrives you need to use the “NP” button once again in the opposite direction in order to confirm the train’s arrival.
Dispatching on the semi-automatic interlock
When dispatching on the semi-automatic interlock, you need to use end- and starting blocks, as well as to communicate with your neighboring dispatcher in order to agree if the line is clear.
Arrivals
After confirming the route is clear to the neighboring dispatcher, you should expect the interlock direction light blinking white. After using the “allow” (“Poz”) button the arrow will turn red.
After the train leaves a section behind the signal, an end block light will come on. When you use the button the light extinguishes and the interlock returns to idle.
Departures
In order to receive an approval to turn the interlocking on, you need to call the neighboring dispatcher and ask if the route for train number via track number is free.
After receiving such confirmation you can proceed and turn the interlocking on with the “Wbl” button. After the neighboring dispatcher allows the interlock on, it will set in the chosen direction and you will be able to dispatch a train. When the train arrives at the neighboring station, its dispatcher will set the end block free and the interlock returns to idle.
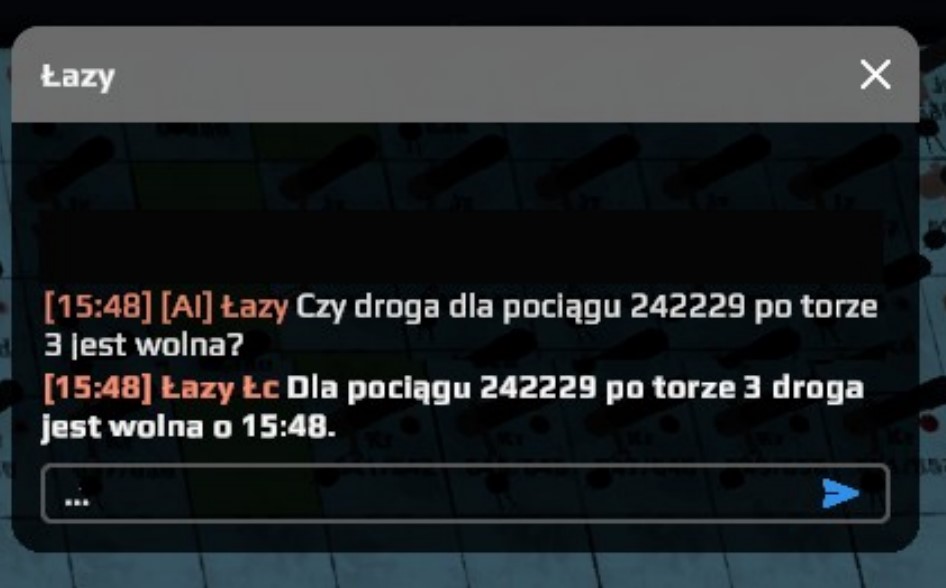
Communication with other players
Telephone conversations with neighboring dispatches
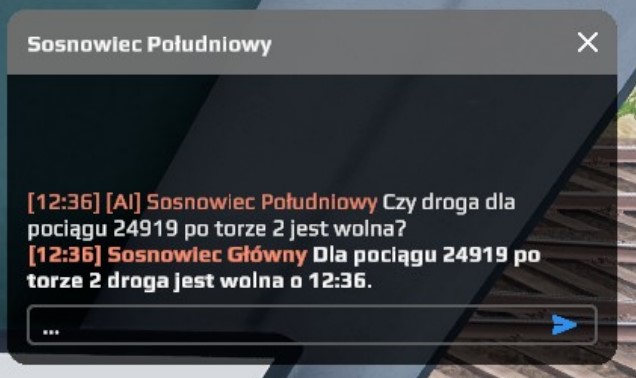
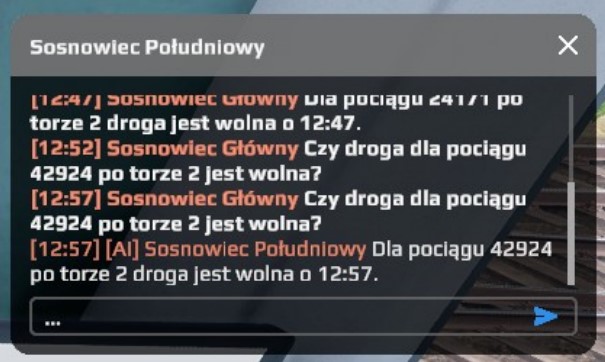
The dispatchers use this telephone to contact each other. To call a neighboring post click on the handset – you’ll hear a constant dial tone – and choose one of the highlighted square buttons to the right, each one representing a neighbor. If the button is highlighted in purple, the AI Dispatcher is active at this station, and only chat communication is available. After selecting the dispatcher you wish to call, a popup will show allowing you to choose if you wish to use voice (microphone icon) or text chat (chat icon) to contact them. If you chose voice the call will start, and when it’s received by the other dispatcher you can speak to them. You don’t need to use push-to-talk button when talking on the telephone. If you chose text chat, a chat window will open, and another popup will show, this time containing predefined commands and phrases. The AI Dispatcher will only respond to the predefined options when they are filled in with correct data. After you’re done with the call, simply put the handset back where you took it from.
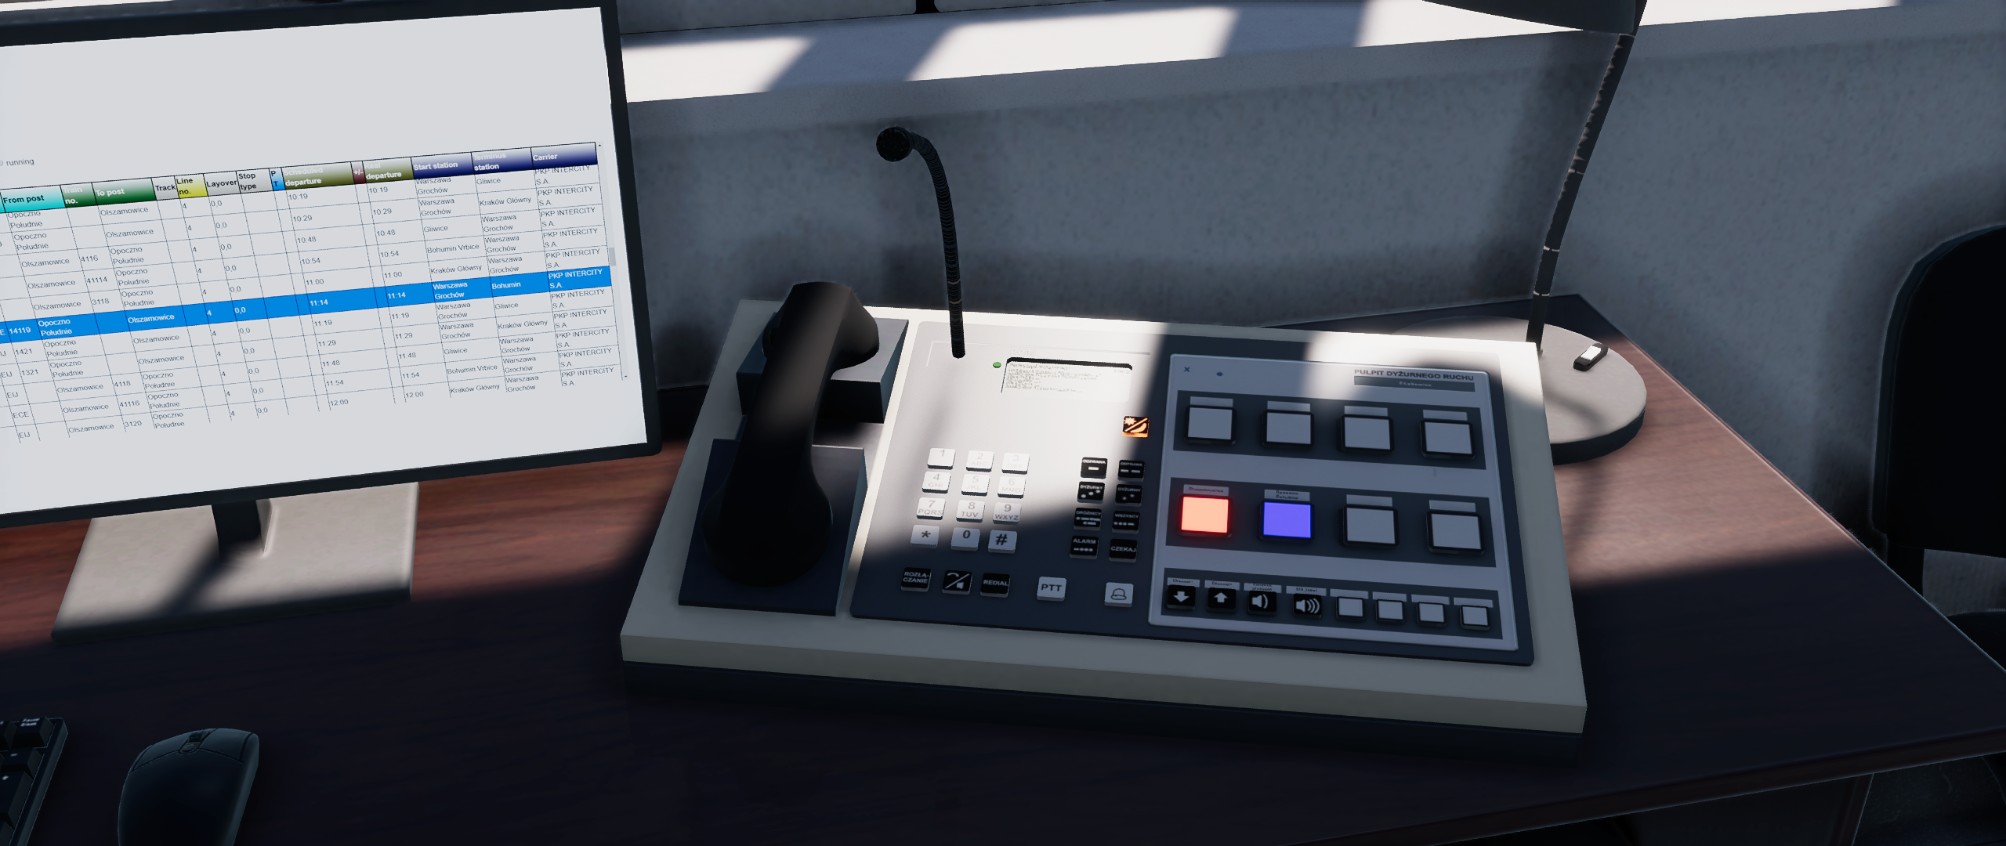
Should another player contact you, it’s caller selector will highlight in red and you will hear the telephone ringing. To receive the call simply click on the handpiece. During the call the selector button will be highlighted in green. To end the call just put the handpiece down and the caller’s button will return to gray.
Radio telephone conversations
The radio is used mainly to contact the drivers, although it may be used to speak with other dispatchers when radio announcing operations are in use. The radio operating range is ca. 10-15 km, and the broadcast is open, heard by all the players (both drivers and dispatchers) in range that use the same radio channel. To start broadcasting, push and hold the PTT button (` by default) and release it when you’re finished.